Thursday, August 18, 2016

Why I hate reheated scones


Nothing beats a good cheese scone, fresh from the oven, or at least carrying that residual heat, it’s a soft fluffy wonder that just begs for lashings of butter to melt across the surface. Scones that have gone cold, but still fresh, and reheated are a dry crumbling mess that no amount of lubrication can fix that chalky horridness in your mouth. Give me a cold scone any day over a reheated one I say.

But why is reheated so naff? Well it’s all in the starch, as the hydrated starch molecule is heated it swells, dissolves and gelatinization takes place, which also makes the starch digestible. When warm the starch is a soft malleable fluid gel, and as it cools the gel becomes rigid and retrogrades back to a crystalline structure, which is not thermoreversible, meaning that heating will not turn the rigid crystalline like gel back into a smooth fluid gel.

So that’s why fresh warm scones are soft, moist and giving, but left to cool become drier to the mouth and more brittle and crumbly, reheating is never going to give you back that lush scone, it’s just going to give you a warm dry scone, probably drier as you’ve evaporated off water in the reheating process.

Originally posted on my Tumblr X-posts from Good Food in a Crap Kitchen

Friday, August 12, 2016

Pork and Pepperoni


The inspiration for this dish riffs pretty heavily on a post from Ideas in Food, I highly recommend getting them into your daily reading list, or hit them up on twitter. I actually have version two of this on the go now as I write, I’ve amped up the seasoning and am going to experiment a little more with the cooking and serving, so not really the same dish but this served as a springboard to push ideas further.

Counter to my last post about getting maximum comfort for little effort this post is really pushing things in the other direction, but holy heck is it worth it! It’ll take a little time and a little bit of investment of going to a butcher and getting a decent slab of pork belly, which may or may not be frozen, a supermarket is not going to have what you need, I’ve never seen a good three inch thick slab of belly at one, and quite frankly you’ll probably be paying twice the price. I ended up by chance at Preston's in town after doing my restock at Yan's Asian supermarket and they just happened to have a good deal going on frozen bellies, so $20 later and more than 2kg heavier, I left a happy chappy.

There is a bit to this but it’s not really all active, there is a lot of down time, so there are no stress about getting stuff done on time. You’re going to have to plan ahead a few days, so here is the rough break down.
  • Defrost the belly if you have to, in the fridge.
  • Cure the pork, 24 hours.
  • Remove, rinse and dry the pork. Dust with white pepper and place on a rack uncovered in the fridge for 24 hours.
  • Place in a roasting pan with the braising ingredients, cook for 8 hours at 120ºC.
  • Sometime during that 8 hours make some cavatelli, which is about half an hours work.
  • Remove and rest for half an hour, uncovered.
  • Cook cavatelli and remove excess fat from the braising liquid, taste and season, combine.
So as you can see not really a whole lot of work, mostly down time, but it’s 56 hour investment of time, totally worth it I promise.

Ingredients
Pork belly, 2kg or so
Pepperoni
Bottle of red wine
Tomatoes, 2 cans crushed
White pepper
Cure mix

Cure mix
1 Part Sugar
1 Part Salt
Chilli powder
Garlic powder
Cumin powder
Bay leaf powder


Weigh the pork and work out what 2.5% of the total weight is, that is the weight of sugar and salt to use.
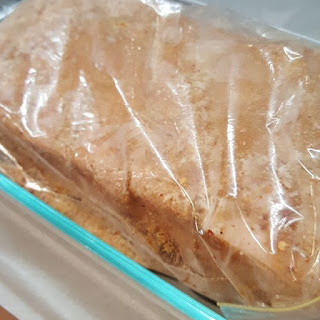

Score the pork deeply to the meat, rub the cure mix in and transfer to a zip lock bag, refrigerate for 24 hours, try to flip it once or twice during that time.


Remove the pork from the bag and rinse, pat dry, coat in white pepper and place on a rack on a pan. Put it back in the fridge for 24 hours.

Time to cook!

Place the pork in a roasting dish. Dice the whole pepperoni and scatter around, add in the tomatoes and the whole bottle of wine, I used a tasty Shiraz. Place the tray into an oven preheated at 120ºC. Set a timer for 8 hours and forget about it.


Well apart from the cavatelli you need to make. Just follow the recipe on this page, I subbed out roasted rye for wholemeal flour but rye would be pretty awesome here too.
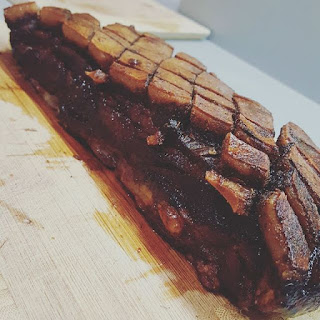

Take the pork out of the oven and very carefully transfer it to a board. Pour the braising liquid into a pot and let it settle for a while, skim off any excessive fat as this will be a sauce, place it over a very low flame to keep warm.


Bring a pot of water to the boil and cook the cavatelli, drain and stir through the sauce, keep warm.
By now the pork should have rested for 30–45 minutes. Slice into thick slabs, cutting along the scores, serve with a generous spoon of cavatelli.

Monday, August 1, 2016

Orecchiette with broken pork sausage


With winter comes comfort food, the down side of the desire for warming rich flavours is time, usually the comfort comes from rich unctuous stews and slow cooks, sure you can cheat with a pressure cooker and little tricks, but it’s not quite the same. Thankfully there are a few dishes that really fulfil that winter rich dish feel and don’t take hours to prepare, there is risotto or other creamy rice dishes, always a crowd pleaser, or you can get really quick and indulgent with the dish pictured above, a simple pasta dish that packs a unctuous punch and is deep in flavour.

There are only a few ingredients in this dish, the main one being sausages, it’s important to spend that little bit extra and get good quality ones with high meat content, sausages shouldn’t be viewed as cheap or budget, unless we’re talking about cocktail wieners then I say cheaper the better. The sausage is also a good place to inject a bit of extra flavour into the dish, I used some good quality pork with fennel with great success, don’t be afraid to experiment.

Pasta is another quick way to change up the dish easily, my go to dried pasta for this is the little ears of orecchiette or shells of conchiglie, if I’m feeling particularly virtuous or ambitious for a throw together meal I’d make the orecchiette myself or make a batch of roasted rye cavatelli, but all and all dried pasta is good, it’s easy, and that’s what this is meant to be, a quick and easy throw together that packs a punch of flavour.

Ingredients
Pasta
3 Sausages, removed from casing.
Basil, handful of leaves sliced
Red onion, thinly sliced
Cream
Garlic, crushed
Chilli flakes, optional

Get a pot of heavily salted water on the to boil, and I mean really get it salty, we want the pasta seasoned well. Cook the pasta according to the packet minus a minute.

Put a heavy based pan on a medium high heat, and break the sausage meat in to the pan while still heating, as the pan heats it will help release the fat from the force meat, leave it to brown, resist the temptation to stir, I like it to sit until it has a nice brown crust and then break it up.

When the meat is thoroughly browned, with crisp crunchy bits and is almost cooked add in the crushed garlic clove, and chilli flakes. When the garlic is cooked, lower the heat and add in a good splash of cream, about 150ml, add most of the basil and stir through. Let it cook for a couple of minutes. Taste and season with salt and pepper.

The pasta should be cooked by now, so strain and dump into the sauce, give it a good stir through and cook for the remaining minute.

Serve with a grate of sharp cheese, garnished with the reserved basil and thinly sliced onion.