Showing posts with label belly. Show all posts

Friday, August 12, 2016

Pork and Pepperoni


The inspiration for this dish riffs pretty heavily on a post from Ideas in Food, I highly recommend getting them into your daily reading list, or hit them up on twitter. I actually have version two of this on the go now as I write, I’ve amped up the seasoning and am going to experiment a little more with the cooking and serving, so not really the same dish but this served as a springboard to push ideas further.

Counter to my last post about getting maximum comfort for little effort this post is really pushing things in the other direction, but holy heck is it worth it! It’ll take a little time and a little bit of investment of going to a butcher and getting a decent slab of pork belly, which may or may not be frozen, a supermarket is not going to have what you need, I’ve never seen a good three inch thick slab of belly at one, and quite frankly you’ll probably be paying twice the price. I ended up by chance at Preston's in town after doing my restock at Yan's Asian supermarket and they just happened to have a good deal going on frozen bellies, so $20 later and more than 2kg heavier, I left a happy chappy.

There is a bit to this but it’s not really all active, there is a lot of down time, so there are no stress about getting stuff done on time. You’re going to have to plan ahead a few days, so here is the rough break down.
  • Defrost the belly if you have to, in the fridge.
  • Cure the pork, 24 hours.
  • Remove, rinse and dry the pork. Dust with white pepper and place on a rack uncovered in the fridge for 24 hours.
  • Place in a roasting pan with the braising ingredients, cook for 8 hours at 120ºC.
  • Sometime during that 8 hours make some cavatelli, which is about half an hours work.
  • Remove and rest for half an hour, uncovered.
  • Cook cavatelli and remove excess fat from the braising liquid, taste and season, combine.
So as you can see not really a whole lot of work, mostly down time, but it’s 56 hour investment of time, totally worth it I promise.

Ingredients
Pork belly, 2kg or so
Pepperoni
Bottle of red wine
Tomatoes, 2 cans crushed
White pepper
Cure mix

Cure mix
1 Part Sugar
1 Part Salt
Chilli powder
Garlic powder
Cumin powder
Bay leaf powder


Weigh the pork and work out what 2.5% of the total weight is, that is the weight of sugar and salt to use.


Score the pork deeply to the meat, rub the cure mix in and transfer to a zip lock bag, refrigerate for 24 hours, try to flip it once or twice during that time.


Remove the pork from the bag and rinse, pat dry, coat in white pepper and place on a rack on a pan. Put it back in the fridge for 24 hours.

Time to cook!

Place the pork in a roasting dish. Dice the whole pepperoni and scatter around, add in the tomatoes and the whole bottle of wine, I used a tasty Shiraz. Place the tray into an oven preheated at 120ºC. Set a timer for 8 hours and forget about it.


Well apart from the cavatelli you need to make. Just follow the recipe on this page, I subbed out roasted rye for wholemeal flour but rye would be pretty awesome here too.


Take the pork out of the oven and very carefully transfer it to a board. Pour the braising liquid into a pot and let it settle for a while, skim off any excessive fat as this will be a sauce, place it over a very low flame to keep warm.


Bring a pot of water to the boil and cook the cavatelli, drain and stir through the sauce, keep warm.
By now the pork should have rested for 30–45 minutes. Slice into thick slabs, cutting along the scores, serve with a generous spoon of cavatelli.

Monday, November 5, 2012

Twice cooked roast pork belly


There are dishes which you wish had a quick and easy version, or at least a way of getting the benefits of a long cook in a short time. Pork belly is one of those roasts that easily falls into that category, you want unctuous fall apart flesh and crisp salty crackling. There are a lot of shortcut methods that purport to achieve this miracle, but I have yet to find a one that doesn’t compromise some aspect of what should be a rather tasty bit of meat. As with anything worth doing, it should be done right, with a little forethought and planning you can spend a relatively short active time cooking to achieve perfect roasted pork belly.


Set your oven to 120–130ºC. Place the pork belly in an ovenproof dish, add herbs and some liquid, thyme and cider’s always nice, or a few juniper berries and bay leaves. Don't forget to season the meat. Cover the dish with a snug layer of tin foil. Cook for about 5 hours.


When time is up carefully remove the pork from the dish and set aside to rest. Get two dishes (I use a couple of rectangular oven dishes), ideally one will be slightly smaller, line the base with a piece of baking paper, place the pork in the dish and lay another piece of baking paper on the pork and then put the other dish on top, press down gently, you could weigh it down with some cans but I find wrapping it tightly in clingfilm does the trick and takes up less room in the fridge. Refrigerate overnight.


Ready to devour some porky goodness? Well not long now. Set the oven to 220ºC, I just crank mine up to full. Remove the pork from the fridge, score the skin side, portion it and season the skin side with salt. Get an ovenproof pan on a hot heat, and when almost smoking, place pork in the pan, skin side down. Put the pan in the oven and cook for 15–20 minutes.


That’s about it, get it from the oven, don’t forget that pan handle is going to be hot! Transfer the pork a board, skin side up, let it rest for 5 minutes or so, and then greedily eat it all up. All and all, some delicious roasted pork belly took you 10–15 minutes of active cooking, and a whole lot of waiting, but I think you’ll agree it’s worth the wait.

Saturday, November 19, 2011

Homemade Bacon - Part 1.9


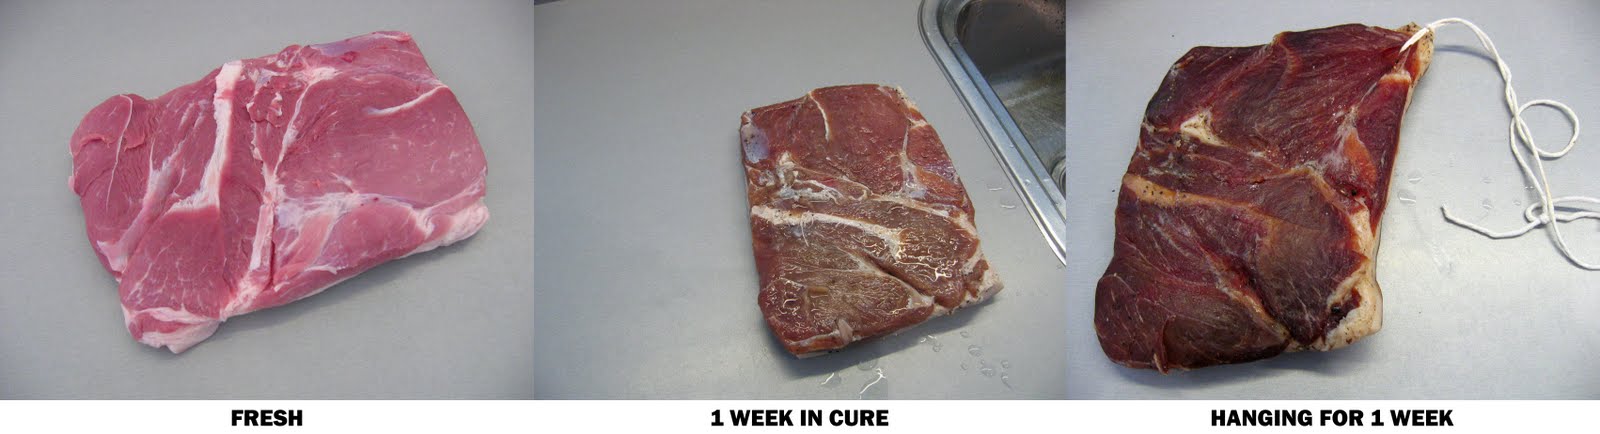
Final post of the bacon coming soon, I've just finished smoking it and at the moment it's sitting in the fridge to firm up before I slice it. Here's a snapshot of how the pork belly has transformed over the two weeks it took before it got to the smoker.

Read Part 1.5

Read Part 1

Sunday, November 13, 2011

Homemade Bacon - Part 1.5


A small update on the progress of my home made bacon. It has been curing for 7 days in the fridge, so pulled out and thoroughly rinsed, and patted dry with paper towels. The meat has firmed up and darkened in colour.


A small hole is made in the corner so some kitchen string can be looped through to hang it. It will hang for about a week (I've hung it up under the stairs as the temperature seems to be pretty stable at about 10°C).

So next weekend the smoker will be lit and bacon will be made, but it seems such a waste to just do bacon, so I plan on getting a ham on to brine in the middle of the week to add to the smoker, along with a bunch of garlic, and a tray of salt.

Note: You should check the hanging meat daily, and if any spots of mold appear don't panic, just wipe the mold off the meat with a paper towel dipped in vinegar.

Wednesday, November 9, 2011

Homemade Bacon - Part 1


Ever since reading Michael Ruhlman's post on home curing Pancetta I had an overwhelming urge to make my own bacon, and with the purchase of a BBQ and now having the ability to smoke stuff, it had to be done.


So I set about finding some pink salt also known as Prague Powder #1 (it's a mix of salt and sodium nitrite), I had little luck trying to find a store or supplier handy in NZ, and was about to ring the local butcher when I finally thought of TradeMe, lo and behold success!

The pink salt turned up and I had a pork belly ready to turn in to bacon, so I turned to Ruhlman's website to get the recipe for the curing mix. By now I had read up a bit on Sodium Nitrite and the latest Cooking Issues radio show didn't help at easing my mind about using an ingredient that is essentially toxic.

So with that paranoia swirling around my head I thoroughly checked the recipe. The Sodium Nitrite levels were greater than 200ppm (parts per million), damn the FDA recommends having a level of less than 200ppm for human consumption. Was I to trust a very famous chef or the FDA? Thank god for twitter! One tweet later a tweet back "we're altering all pink salt recipes: measure it at 0.25% of weight of meat for 156 pp". A bit of maths later I had my mix recipe.

450 grams of Kosher Salt
225 grams of Sugar
35 grams of Pink Salt


Mix it in a jar and store in a dry place, make sure to mark it as Curing Salt as you don't want to accidentally consume it. I recommend storing it out of the kitchen to avoid this.


Weigh the piece of pork that will be cured and measure out 5% by weight of the Curing mix.


To flavour the pork, I coarsely ground some black pepper, juniper berries and bay leaves. I then mixed in quarter of a cup of Muscovado sugar and the weighed curing mix.


I found a zip lock bag an easy way to evenly distribute the mix.


Spread the mix evenly over the pork and place in a zip lock bag. Place in the fridge for 7 days, making sure to redistribute the mix around the meat each day, and flip over.

Well that's where I'm at, in a few more days it'll come out of the fridge, get rinsed off and hung up to dry, and finally after drying for up to 7 days (I think) it'll get smoked... So more soon.

Read all 3 parts

Sunday, April 3, 2011

Pork Belly... again


Tried a different method this time though, in a dutch oven...

First I made a dry spice rub by powdering mustard, coriander, cloves, bay leaves, black pepper and salt.


Then I sliced a couple of onions up to act as a trivet so the pork wouldn't be sitting directly on the pot (and also so I ended up with some tasty caramelised onion), then to the pot I put in a couple of good slugs of cider vinegar.

Placed the pork covered in the rub on top of the onions, lid on and in the oven at 130°C for 2.5 hours, then cranked up the heat to 220°C took the lid off the pot and cooked for another 30 minutes.

The results were very juicy melt in your mouth meat, with good crust.