Tuesday, October 30, 2012

Fish pie


There's something deeply satisfying about fish pie, it's absurdly simple to make, you can tweak it to your hearts content and you get rewarded with luscious fishy béchamel, tender flakes of fish and crispy crunchy potato topping. Now you could tweak it, put a twist on it, but I like it simple. Béchamel made with milk that the smoked fish has been poached in, boiled egg, potato topping and lashings of butter, in fact butter is probably the second most important ingredient in this pie as there is almost as much butter as fish.

Fish pie
450g Smoked fish, I like using a mix of mackerel and hoki
Bay leaves
Peppercorns
2 x 150g Butter
500ml Milk
100g Flour
Mashing potatoes
2 Hard boiled eggs, quartered (do I need to give you instructions? Ok, fill a pot with cold water, put eggs in it, put on heat, boil for 10 minutes, rinse under cold water until cool).

Heat your oven to 180°C.


In an oven-proof dish, place the fish, a couple of bay leaves, and a dozen or so peppercorns, pour over the milk, cover with tinfoil and cook in the oven for 20 minutes. When cooked, remove the fish from the milk and strain, reserving the milk. Pick the skin off the fish and break into bite size pieces.

Peel, boil and mash the potatoes with 150g of butter, season well.

Melt 150g of butter in a pan over a medium heat, add the flour and cook, make sure not to colour the flour at all. Pour in the milk and whisk to avoid lumps. This is a thick béchamel, and wheat flour is a flavour thief so season well! Gently fold the béchamel through the fish chunks and reassess seasoning.


Spoon the fish mixture into your pie dish and nestle in the egg segments, arranging so evenly distributed. Using an offset spatula spread over an even layer of the mashed potato, use a fork to give it some texture, or alternatively you could pipe it on. Dot the top of the pie with plenty of butter, I'm more than sure you can't over do it.

Cook at 200°C for 20–30 minute, or until golden brown and crunchy.

Wednesday, October 24, 2012

Egg yolk 'ravioli'


Wouldn’t you know it, another egg related post, although this was merely a side experiment that I did when I set about making seamless ravioli (an upcoming post, and yet again tweet inspired). This isn’t the quickest way to make an egg yolk ‘ravioli’, however it is very straightforward, and a little less bothersome compared to traditional yolk ravioli, especially when it comes to cooking and keeping the yolk liquid.


Pour a bed of fine semolina flour in a container big enough to hold however many yolks you are making, make indentations with the back of a spoon, so the yolk has a place to rest. Carefully crack open the eggs, separate the yolk and remove the chalazae, the white string of protein attached to the yolk to hold it in place. Lay the yolks into the indentations in the flour and dust over a covering of semolina flour. Cover with cling-film (or a lid) and place in the fridge for a couple of days. Letting it rest allows the moisture in the egg yolk to hydrate the starch in the flour, and cooking will gelatinise it forming a ‘pasta’ layer.


When you’re ready to cook, bring a pot of salted water to the boil and drop the yolks in, cooking for a couple of minutes, not too long as you don’t want to cook the yolk through just warm it.

Friday, October 19, 2012

13 minute eggs


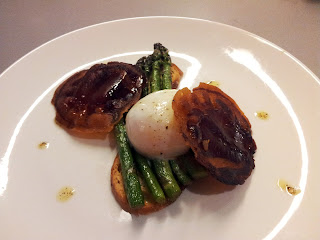
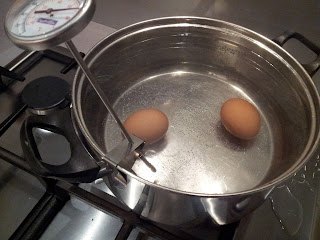
I came across this method in Ideas in Food, and it got filed away into the must try that sometime. Asparagus finally readily available it seemed like a perfect time to try substituting out the poached egg with this 13 minute egg in one of my favourite combinations, butter roasted spears of asparagus, Pancetta and egg. It probably isn’t the most straightforward way to cook an egg, however unlike previous temperature sensitive cooking this does not involve staring at a thermometer for hours on end, only 13 minutes. OK well you may be asking why do I want to keep an eye on a pot of hot water for 13 minutes, it’s only an egg. Well it may only be an egg, but it’s an egg with a silky soft white and warm liquid yolk, a far easier and hassle free stand in for a poached egg, especially if you’re making more than a couple, and to top it off, you can cook the eggs up to two days ahead of time and just reheat in a 60°C for ten minutes.


  • Bring a pot of water to 75°C, using a large volume of water will make maintaining a constant temperature easier. 
  • Place the eggs into the water and cook for 13 minutes, don’t use eggs straight from the fridge.
  • Transfer the eggs to an ice bath to cool. 
  • Reheat the eggs at 60°C for 10 minutes, or store in the fridge for up to 2 days. 
  • Shelling them can be a bit tricky, but that could just be me, I have terrible luck with eggs, but I find with these eggs the easiest way is to use a knife to crack around the fat end of the egg, remove the shell and pour the egg out.

Monday, October 15, 2012

Pan Roasted Brussels sprouts


This recipe was originally created for Urban Harvest, do go check out their website for some great produce and other recipe ideas.

Many people still screw their nose up at the humble Brussels sprout, with memories of childhood dinners, over boiled mushy green sprouts taunting them from the plate. But cooked properly, nothing can beat the sprout in my opinion. Simple is best, steamed with lashings of butter, roasted in the oven, or like below, pan roasted.

This recipe is ideal for a light meal, and will serve 2–3, it also works great as a side dish to a roast chicken.

300 g Brussels sprouts
150 g Gypsy bacon, cut into lardons
½ cup roughly chopped walnuts
3 baby celery
¼ tsp chili flakes (optional)
Olive oil
Lemon Juice or Cider Vinegar
Salt and Pepper 
  1.  Clean the Brussels sprouts, discarding any tough outer leaves. Cut them in half (or quarters if they’re particularly large), and remove the stem. 
  2. Wash the celery, remove the root end, and slice thinly including the leaves. 
  3. Toast the walnuts and chilli flakes in a pan over a medium heat, taking care not to burn them, when toasted set aside and wipe out the pan. 
  4. Pour a drop of olive oil into a heavy based frying pan (20cm) and add the bacon, slowly cook over a medium heat, until most of the fat has rendered and the bacon has become crisp around the edges. 
  5. Add the Brussels sprouts, spreading out evenly, and let cook undisturbed for a minute, give them a stir, you want the Brussels sprouts to brown not burn, cook for another minute, then add a splash of lemon juice (or vinegar), let the Brussels sprouts cook for a further 2 minutes. 
  6. Stir through the celery and walnuts, taste and season with salt and pepper. 
  7. Serve.

Wednesday, October 10, 2012

Hare


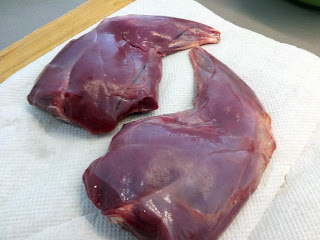
Some things are just too good to pass up, especially a pair of hare legs for less than eight bucks! Hare is probably my favourite game meat, lean dark rich flesh. Cooked well it’s wonderfully soft and tender, but get it wrong it is quite frankly crap, either stringy and dry, tough as old boots, or make the the mistake of over cooking it can turn to mush. Don’t get me wrong, it’s not a hard meat to cook, it’s just one that lets you know you did wrong by shouting at you. So when cooking take into consideration the leg muscle of the hare, it’s very lean and does a lot of work, so a slow braise is the best bet.

The bonus of it all is that hare meat has strong flavour that can stand up to some hefty complementary flavours, such as, in this case a good strong red wine, port sauce, and some awesome baby beetroot (greens and all, thank you for not chopping them off) as acompaniament.

You’re going to have to forgive the lack of measurements, as the best I could do for you is use enough of each ingredient and you won’t go wrong.

Ingredients
Hare legs
Carrots, diced
Onion, diced
Garlic, crushed
Thyme
Bay leaves
Dijon mustard
Tomato paste
Juniper berries
Flour
Paprika, hot
Salt & pepper


  • Dredge the hare legs in some flour seasoned with hot paprika, salt and pepper, shaking of any excess flour.
  • Brown the legs on all sides in a hot pan with a little olive oil.
  • Lay the legs on a bed of thyme, bay leaf and juniper in a casserole dish.
  • In the same pan sautée the onion, carrot and garlic until soft.
  • Deglaze the pan with a splash of port and stir through some tomato paste and mustard.
  • Pour in the red wine (enough to cover the hare in the dish you’re cooking them in), bring to a simmer.
  • Pour over the hare.
  • Cover the dish with a double layer of foil and cook at 160°C for 2–3 hours, until tender.


Beet Purée
Peel beetroot and steam it until fork tender.
Purée.

Pickled Beet
Cider vinegar
Thyme
Sugar
  • Slice the beets paper thing (use a mandoline).
  • Heat the vinegar with thyme and sugar until simmering.
  • Pour the vinegar over the beet slice and let steep.

Beet greens
Really simple one, heat butter in pan until foamy, sautée the beet greens, done.

Polenta
Instant polenta
Stock
Crème fraîche

Bring 500ml Chicken stock to the boil, remove from the heat and whisk in 125 grams of instant polenta, keep whisking until thick, you may have to put it back on the heat for a couple of seconds, but usually it isn’t needed. Add half a tub of crème fraîche and whisk in until fully incorporated.


Plate up
Spoon a pillow of polenta with the greens placed in the centre, deboned hare leg placed on top with the sieved cooking juices spooned over. Arrange beet purée and pickled beet slices around the plate.

Saturday, October 6, 2012

Bread, again


Bread is one of those basic staples everyone should know how to make, it’s easy to learn, and takes a lifetime to master. The most simple and basic of loaves is 1 kg flour, 600ml water, 30 grams yeast, and 20 grams salt, mix, knead, let it double in size, shape, rise again and bake. Simple. But there is so much more to the humble loaf than just that set of ratios and steps, you can increase the hydration, add fats to enrich the dough, let the dough ferment for longer, add vinegar, whip it in a beater, not knead it at all, the ideas are limitless when it comes to bread making.

Hydration is probably my favourite way to experiment with bread making, it significantly changes the texture of the crumb, go high enough and the baked bread has an almost plastic-like interior, and you can achieve some pretty light loaves. I’ve also been interested in the order that the loaf is made, does it have to be mix; knead; rise; punch down; shape; rise; bake; or could I let it rise once, then whip it with a dough hook in the beater?

When adding fat, you have to be careful when in the process it is incorporated, too soon the fat will coat the flour and prevent gluten formation, so you’ll end up with a denser shorter crumb, in saying that though, if the total fat is less than 5%, it shouldn’t matter when you add it. If the fat is greater than 5% it’s best to add it after you have given the dough a good knead, so the gluten has already formed. Adding fat to your dough will give you a softer, finer crumb, usually a softer crust too, not to mention the richness it adds.

I recently made a standard 100/60/3/2 ratio bread (see above), with a bit of butter and a longer ferment, it went down a treat.

The night before in a bowl mix together 200 ml of warm water and add 5 grams of yeast, stir it to dissolve. When the mixture begins to foam, stir in 200 grams of flour. Leave overnight, or 24 hours. Leaving the starter to develop adds a pleasant sourness to the bread.


The next day dissolve 10 grams of yeast in 100 ml of warm water, and then add that and 300 grams flour to the starter. Mix together and knead for a good 10 minutes, until smooth and elastic. This is a lot easier with a beater, but you should be able to manage it by hand, mix (or in a beater with a dough hook) in 100 grams of room temperature butter bit by bit. Once it is incorporated let the dough rest for about half an hour, or until it had doubled in size. Punch the dough down, and then shape and let it double in size again.


Preheat the oven to 220ºC. Before putting the dough in, pour half a cup of water on to the bottom of the oven to create some steam. Put the dough in the oven, and turn the temperature down to 200ºC, cook for about 30 minutes, or until it sounds hollow when tapped on the bottom, or until the internal temperature is 90–94ºC.