Showing posts with label bacon. Show all posts

Wednesday, October 8, 2014

Ricotta Cavatelli


I’m becoming quite addicted to the Google Keep App, it’s a large tile of post-it like notes or lists that you can access via a web page or phone/tablet app. I find it handy for jotting down ingredients or ideas, partial and full, and the obvious shopping lists and being able to tick off as you go. This started out as one of those little post-its, “artichokes, pine-nuts and sultanas”, I had that down and wanted to do something with it. I happened to have a tub of Zany Zeus ricotta in the fridge and a desire to revisit cavatelli, so again much consternation about finding some consistency across recipes for ricotta cavatelli I ended up forming what I thought would be a good ratio and set to work.

I did happen to mention the cavatelli accompaniments to my other half, and much like any savoury with a fruit addition her nose screwed up and indignantly told me in no uncertain words that she would not be having that for dinner, so she got a garlic-bacon-tomato sauce that was whipped up.


Ricotta Cavatelli
200g Flour
200g Ricotta
1 egg
5g salt
  • Mix the flour and salt together and form a well.
  • Add the ricotta and egg.
  • Use the back of a fork to mash the egg and ricotta together, slowly working into the flour.
  • Use your hands and form into a ball.
  • Knead for about 5 minutes, until nice and smooth.
  • Wrap in cling-film and refrigerate for half an hour.
  • Roll out the dough on a well floured bench and cut into strips ready for the cavatelli machine.
  • I floured the machine, and on top of the roller so a bit of flour gets sprinkled over the dough with each turn.
  • Pinch the dough and run through the machine.
  • Toss in flour to keep the cavatelli separated until you’re ready to cook.
  • Shake off any excess flour and cook in well salted boiling water for 3–5 minutes.

For the pictured dish:
  • Soak sultanas in a hot liquid
  • Toast pine-nuts
  • Quarter cooked artichoke hearts
  • Pick some pea-shoots
  • Zest and juice lemon
  • Finely chop some parsley, dill would be nice too
  • Sauté the artichokes in a little olive oil and butter until they begin to caramelize.
  • Toss in the lemon zest, sultanas and pine-nuts.
  • Stir in some butter and toss through.
  • Taste and season with lemon juice and salt (I’m totally obsessed with smoked salt at the moment).
  • Add the parsley and cooked cavatelli, toss together.
  • Dish up and garnish with the pea-sprouts.


Bacon-tomato sauce
2 rashers of bacon
1 can of good tomatoes
1 onion
3 big garlic cloves
cider vinegar
salt
chilli flakes

In a pot over a medium heat, sauté the chopped onion and whole garlic cloves, when soft add the chopped bacon, cook until the bacon has rendered most of the fat but not coloured too much, add a splash of cider vinegar, add the tomatoes and a pinch of chilli, cover and turn the heat down, cook for about 20 minutes. The onions and garlic should be very soft, purée the sauce with a stick blender, taste and season with salt and adjust the acidity with vinegar. Simmer until the desired consistency is reached. Toss cooked cavatelli through the sauce.

Saturday, February 1, 2014

Pâté de Campagne


I bought myself a wee early Christmas present, a Le Creuset Terrine, I’ve always wanted one but the price tag has put me off until now, however I had plans for my contributions toward the Christmas fare and it seemed as good of an excuse as any to indulge myself. I’ve previously mentioned the Walnut bread and Chicken Liver Pâté, but they were mere sides to my ambitious plans, well maybe not that ambitious, of Pâté de Campagne is pretty simple to put together, although the mincer from hell almost broke my wrist but apart from that it’s just few simple steps and patience.

You’ll have to excuse the lack of gram measurements, as these will depend on how large your terrine is. Also if you can get pork liver, great, if not use chicken, the same can be said of caul fat which I couldn’t get my hands on so I used very fatty belly bacon.


Meat
2 parts pork shoulder
1 part pork back fat
1 part liver

Trim the livers and cut in half, cut the back fat and should in to cubes small enough to fit through your mincer feeder. Chuck the whole lot in a bowl that will fit in your fridge.


Marinade
Brandy
White wine
Sage
Thyme
Parsley
Shallots
Nutmeg
Pink Salt (optional, use 1% by weight of the meat)

Roughly chop the herbs and shallots and toss into the bowl with the meat, grate in nutmeg to taste. Pour in a glass of wine and a splash of brandy. Add the pink salt if you’re using. Stir through and cover. Refrigerate overnight.


Other
Streaky bacon/caul fat
1 egg
Salt (around 2% by weight, this can be adjusted later)

Set your mincer up with a medium die and pass through the meat mixture. Using your fingers mix through the salt and egg. Take a small portion and wrap in cling film, making it water tight, and poach in some simmering water until cooked, taste and adjust the seasoning as needed, remember that the terrine is served cool so the seasoning will be more muted.


Line the terrine with the bacon (or fat) and pour in the minced mixture. Tap the terrine on the bench to get rid of any air pockets. Fold the bacon over the top of the mixture and place on the lid. Place the terrine in a bain-marie (with hot water) and into an oven set at 150–160°C, cook for about 2.5 hours, or until the internal temperature is about 70°C (65°C should be enough though).


Remove from the bain-marie and let cool, then weigh down a tight fitting lid with a couple of cans, use a stiff piece of cardboard cut to the correct shape and wrap in tin foil, refrigerate overnight.

Serve with pickled onions, cornichons, hot mustard and my walnut flat bread.

Wednesday, August 21, 2013

Peas and Lettuce

Well a quick little post before I get on a plane and spend a week on an island lounging next to a pool with a book in one hand and a drink in the other.


This is a great little side dish that’s packed full of flavour and a novel way of serving lettuce, or it can be made a bit more substantial and turned into a light meal with the addition of a poached egg (or 13 minute egg). There’s not a whole lot of prep that needs to be done, and it all should be easy to knock off while the egg gently cooks.

13 minute egg
1 Baby Cos, sliced crosswise into 1 cm strips
2 rashers of streaky bacon, diced
Handful of frozen peas
half a cup of chicken stock, use less if it’s already reduced
Mustard, a good spoonful
Shallot, very finely diced
Anchovies (to taste), minced


Sauté the onions and bacon in a little olive oil, try not to colour it too much, when cooked through add the anchovies and cook until amalgamated. Pour in the chicken stock and add the mustard, simmer until it has reduced by about half. Add the peas, and when almost cooked add the lettuce and simmer until it has become limp, take care not to overcook the lettuce. Season with salt and pepper and serve in a bowl with the egg placed in the centre. The runny yolk mingles with the stock and creates a lush sauce.

Thursday, August 8, 2013

Caesar Salad


Whenever I make up a batch of 13 minute eggs I usually make a couple extra so they can sit in the fridge and be used over the next few days, it seems like a waste of effort to only make one or two when I need them, plus they make a great Caesar Salad dressing. Well my version of a Caesar dressing on my version of the Salad, an easy toss together lunch or light dinner and a great way to use up a glut of cos lettuce.

Dressing
1 very soft egg (13 minute egg)
1 tsp hot mustard
Juice of one lemon
rice bran oil, to start the emulsion
olive oil, to bulk out
salt
pepper
cayenne

Use a whisk to break up the egg, stir in the mustard, whilst whisking slowly, drip-by-drip, pour in the rice bran oil, once a stable emulsion has been formed switch to olive oil, I usually end up using about a fifty-fifty mix of oils, add the lemon juice, salt, pepper and cayenne pepper to taste.

Salad
1 baby cos
Streaky bacon
croutons
red onion

Well it’s all prep and assembly really, firstly I like to cook the bacon, starting in a cold oven to help the fat render, cook it until it’s nice and crisp or as Agent Dale Cooper would say “Bacon, super-crispy. Almost burned. Cremated.”[1] Remove the bacon from the oven and drain on paper towels.

Using the same tray, toss cubed bread in the hot bacon fat and put in the oven until the bread is golden and crunchy.

Thinly slice the red onion, much like anchovies you’re either a fan of raw onion or not, I love it.

Separate the lettuce leaves and thoroughly wash set aside to drain.

Building the Salad
Garlic confit (or slow roasted garlic)
Anchovies

If you’re making the salad for more than one, and perhaps not everyone appreciates anchovies for  just how awesome they are, this is a simple way to customise the dressing for each serving. So in a clean bowl put in some minced anchovies, to taste, along with a clove or two of some garlic confit, mashed, a large spoon or so of the dressing and mix through.

Build up the salad putting in enough leaves, bacon, croutons and onion to satisfy and gently toss through the dressing.

Monday, October 15, 2012

Pan Roasted Brussels sprouts


This recipe was originally created for Urban Harvest, do go check out their website for some great produce and other recipe ideas.

Many people still screw their nose up at the humble Brussels sprout, with memories of childhood dinners, over boiled mushy green sprouts taunting them from the plate. But cooked properly, nothing can beat the sprout in my opinion. Simple is best, steamed with lashings of butter, roasted in the oven, or like below, pan roasted.

This recipe is ideal for a light meal, and will serve 2–3, it also works great as a side dish to a roast chicken.

300 g Brussels sprouts
150 g Gypsy bacon, cut into lardons
½ cup roughly chopped walnuts
3 baby celery
¼ tsp chili flakes (optional)
Olive oil
Lemon Juice or Cider Vinegar
Salt and Pepper 
  1.  Clean the Brussels sprouts, discarding any tough outer leaves. Cut them in half (or quarters if they’re particularly large), and remove the stem. 
  2. Wash the celery, remove the root end, and slice thinly including the leaves. 
  3. Toast the walnuts and chilli flakes in a pan over a medium heat, taking care not to burn them, when toasted set aside and wipe out the pan. 
  4. Pour a drop of olive oil into a heavy based frying pan (20cm) and add the bacon, slowly cook over a medium heat, until most of the fat has rendered and the bacon has become crisp around the edges. 
  5. Add the Brussels sprouts, spreading out evenly, and let cook undisturbed for a minute, give them a stir, you want the Brussels sprouts to brown not burn, cook for another minute, then add a splash of lemon juice (or vinegar), let the Brussels sprouts cook for a further 2 minutes. 
  6. Stir through the celery and walnuts, taste and season with salt and pepper. 
  7. Serve.

Friday, July 20, 2012

Bacon bone soup


It’s been a little longer than normal since my last post, but with work being crazy busy at the moment, and me going ever so slightly mental over the upcoming Visa Wellington on a Plate, The City Market: Pecha Kucha presentation, nothing like deadlines to bring out the best in you, maybe. But I can see the light at the end of the tunnel, and the pressures are slowly abating, plus I’ve got four days to unwind, de-stress and really put my thinking cap on.

In my ever humble opinion, and I know the better half very much disagrees, nothing beats split pea and bacon bone soup, rich, salty, thick, soupy goodness that warms the very soul on a dark winter's night. However as I mentioned, the better half ended up being tortured with the luscious aromas of simmering bones and split peas, and boy did she let me know she was not happy, a pity too, seeings as I made a five litre batch, oh well more for me, and anyway it was her fault for buying me a 16 litre stock pot for my birthday, what was I meant to do?

The quantities in this recipe is for a rather large batch soup, but should scale down (or up) pretty easily, and if you don’t have access to bacon bones a bacon hock should suffice. I know the vegetable quantities are rather vague, I didn’t take very good notes on this one, but just add to your own tastes.


1.5 kg Bacon Bones
4 cups Green Split Peas
1 Large bouquet garni of fresh herbs (parsley, thyme, oregano etc)
1 Tbsp Caraway seeds
4-5 Juniper berry
3 Bay leaves
Even quantity of Celery, Carrots & Onions diced
5 Litres Water

Get a pot with enough water to cover the bacon bones on to boil. When the water is at a roiling boil, blanch the bacon bones for 3 minutes, to remove any excess salt. Drain.


Add everything to the pot and bring to a simmer, cook for 2 hours.

Now the next part is a bit tricky, probably a lot easier in smaller quantities, you need to remove all of the bones. So with a combination of straining and scooping, remove all of the bones to a bowl, ready to have the meat picked off. You’ll need to let the bones cool down a little before you attempt to pick them over, so while you wait, return everything else (apart from the bouquet garni and bay leaves) to the pot and with an immersion blender, purée the soup. When the bones are cool enough to handle, pick the meat off and place back into the soup, discard the bones. Taste and season.

Serve it up nice and hot with some crusty bread, even better, crusty bread slathered with garlic confit. Unless you’re going to make it through five litres of the soup, wait for it to cool, portion it into containers and freeze.


Head over to Urban Harvest and check out my Pan Roasted Brussels Sprouts recipe.

Wednesday, April 18, 2012

Pork Cheek Bacon


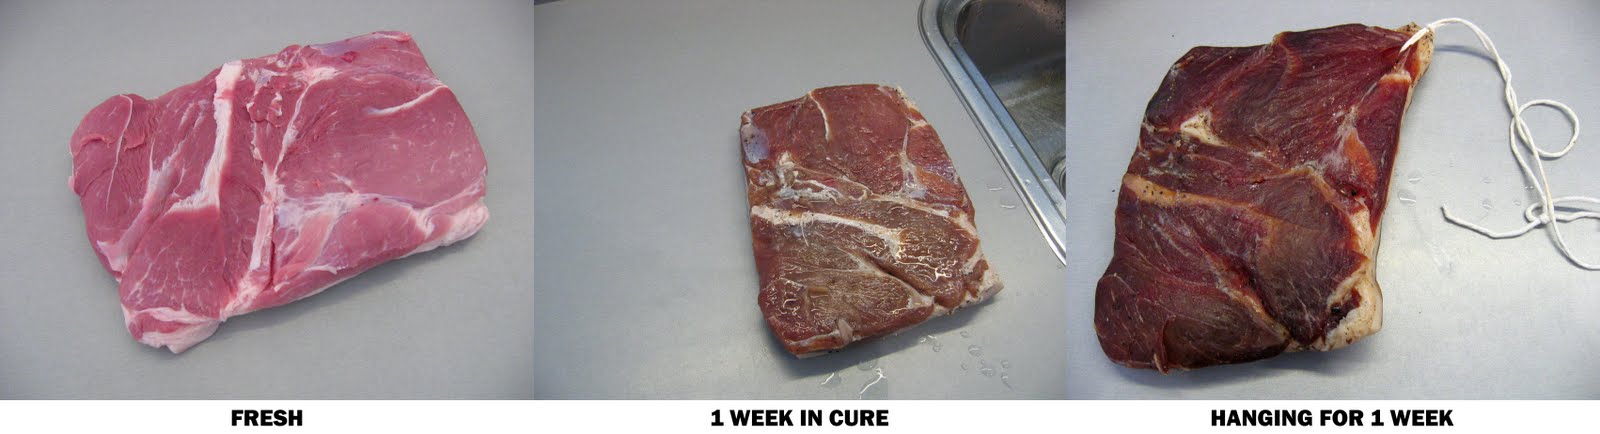
The pork cheek that I made confit with, came with its twin, which I turned into that wonderful meat product called bacon. I used the same process as the previous bacon I posted about. I make a few alterations though, firstly, and the easiest way to change things, I used different herbs and spices in the cure, and I gave it coating of white pepper powder before I hung it, secondly, I wrapped it in cheesecloth when I hung it, and lastly, after smoking it, I pressed it overnight in the fridge.


Thyme, Muscovado sugar and Szechuan pepper. These get combined with the 5% curing mix.


Rinsed, and patted dry after seven days of curing in the fridge (flipping each day).


Dusted in white pepper.


Wrapped in cheesecloth and tied, ready to hang for seven days.


Unwrapped after a week under the stairs. You'll notice a little white fuzz on the pork, that's a small amount of mold, it's important to keep an eye out for it.


It doesn't mean you have to throw away your porky goodness, just wipe off the mold with a paper towel dampened with some vinegar. But if you leave the mold unchecked for too long, it can grow into the interior of the meat, making it inedible.


Smoked to an internal temperature of 65°C, the smoker shouldn't go above 85°C.


Pressed between to baking dishes overnight.


Sliced, portioned and packaged.

Note: Check the pork cheek for glands, if found, remove. If meat comes from a butcher/supermarket you shouldn't find any, but best to check.

Monday, November 21, 2011

Homemade Bacon - The Final


It was finally time to smoke the pork that has been hanging under the stairs, and only hours away from munching down on my very own home made bacon.

Read Part 1.5

Read Part 1

Smoking the bacon is really easy, get the smoker smoking and up to temperature. The smoking temperature should ideally be between 75°C-85°C. Any hotter than 85°C the meat will shrink, loose too much moisture and will be cooking.

When the smoker is ready put in the pork and leave it for about 90 minutes, the internal temperature of the pork when it's done should be 65°C.


Straight from the smoker, looking delicious.


While it's still warm, remove the skin. The skin can be used to make stocks and is excellent to cook beans with.


A few "test" slices taken off the freshly smoked bacon.


Fried quickly in a smoking hot pan.


Had to use so much willpower not to devour the entire lot.

I found making bacon surprisingly easy, and has definitely put me off store bought bacon. So I'll soon be starting the process again so I have a ready supply of bacon. And I am giving serious though to making my own ham, pastrami, pancetta etc.


All sliced up, portioned and vacuum sealed, it should last about 3 weeks in the fridge or 4 months in the freezer.


I also put a tray of kosher salt in the smoker at the same time as the pork.

Saturday, November 19, 2011

Homemade Bacon - Part 1.9


Final post of the bacon coming soon, I've just finished smoking it and at the moment it's sitting in the fridge to firm up before I slice it. Here's a snapshot of how the pork belly has transformed over the two weeks it took before it got to the smoker.

Read Part 1.5

Read Part 1

Sunday, November 13, 2011

Homemade Bacon - Part 1.5


A small update on the progress of my home made bacon. It has been curing for 7 days in the fridge, so pulled out and thoroughly rinsed, and patted dry with paper towels. The meat has firmed up and darkened in colour.


A small hole is made in the corner so some kitchen string can be looped through to hang it. It will hang for about a week (I've hung it up under the stairs as the temperature seems to be pretty stable at about 10°C).

So next weekend the smoker will be lit and bacon will be made, but it seems such a waste to just do bacon, so I plan on getting a ham on to brine in the middle of the week to add to the smoker, along with a bunch of garlic, and a tray of salt.

Note: You should check the hanging meat daily, and if any spots of mold appear don't panic, just wipe the mold off the meat with a paper towel dipped in vinegar.

Wednesday, November 9, 2011

Homemade Bacon - Part 1


Ever since reading Michael Ruhlman's post on home curing Pancetta I had an overwhelming urge to make my own bacon, and with the purchase of a BBQ and now having the ability to smoke stuff, it had to be done.


So I set about finding some pink salt also known as Prague Powder #1 (it's a mix of salt and sodium nitrite), I had little luck trying to find a store or supplier handy in NZ, and was about to ring the local butcher when I finally thought of TradeMe, lo and behold success!

The pink salt turned up and I had a pork belly ready to turn in to bacon, so I turned to Ruhlman's website to get the recipe for the curing mix. By now I had read up a bit on Sodium Nitrite and the latest Cooking Issues radio show didn't help at easing my mind about using an ingredient that is essentially toxic.

So with that paranoia swirling around my head I thoroughly checked the recipe. The Sodium Nitrite levels were greater than 200ppm (parts per million), damn the FDA recommends having a level of less than 200ppm for human consumption. Was I to trust a very famous chef or the FDA? Thank god for twitter! One tweet later a tweet back "we're altering all pink salt recipes: measure it at 0.25% of weight of meat for 156 pp". A bit of maths later I had my mix recipe.

450 grams of Kosher Salt
225 grams of Sugar
35 grams of Pink Salt


Mix it in a jar and store in a dry place, make sure to mark it as Curing Salt as you don't want to accidentally consume it. I recommend storing it out of the kitchen to avoid this.


Weigh the piece of pork that will be cured and measure out 5% by weight of the Curing mix.


To flavour the pork, I coarsely ground some black pepper, juniper berries and bay leaves. I then mixed in quarter of a cup of Muscovado sugar and the weighed curing mix.


I found a zip lock bag an easy way to evenly distribute the mix.


Spread the mix evenly over the pork and place in a zip lock bag. Place in the fridge for 7 days, making sure to redistribute the mix around the meat each day, and flip over.

Well that's where I'm at, in a few more days it'll come out of the fridge, get rinsed off and hung up to dry, and finally after drying for up to 7 days (I think) it'll get smoked... So more soon.

Read all 3 parts

Tuesday, July 12, 2011

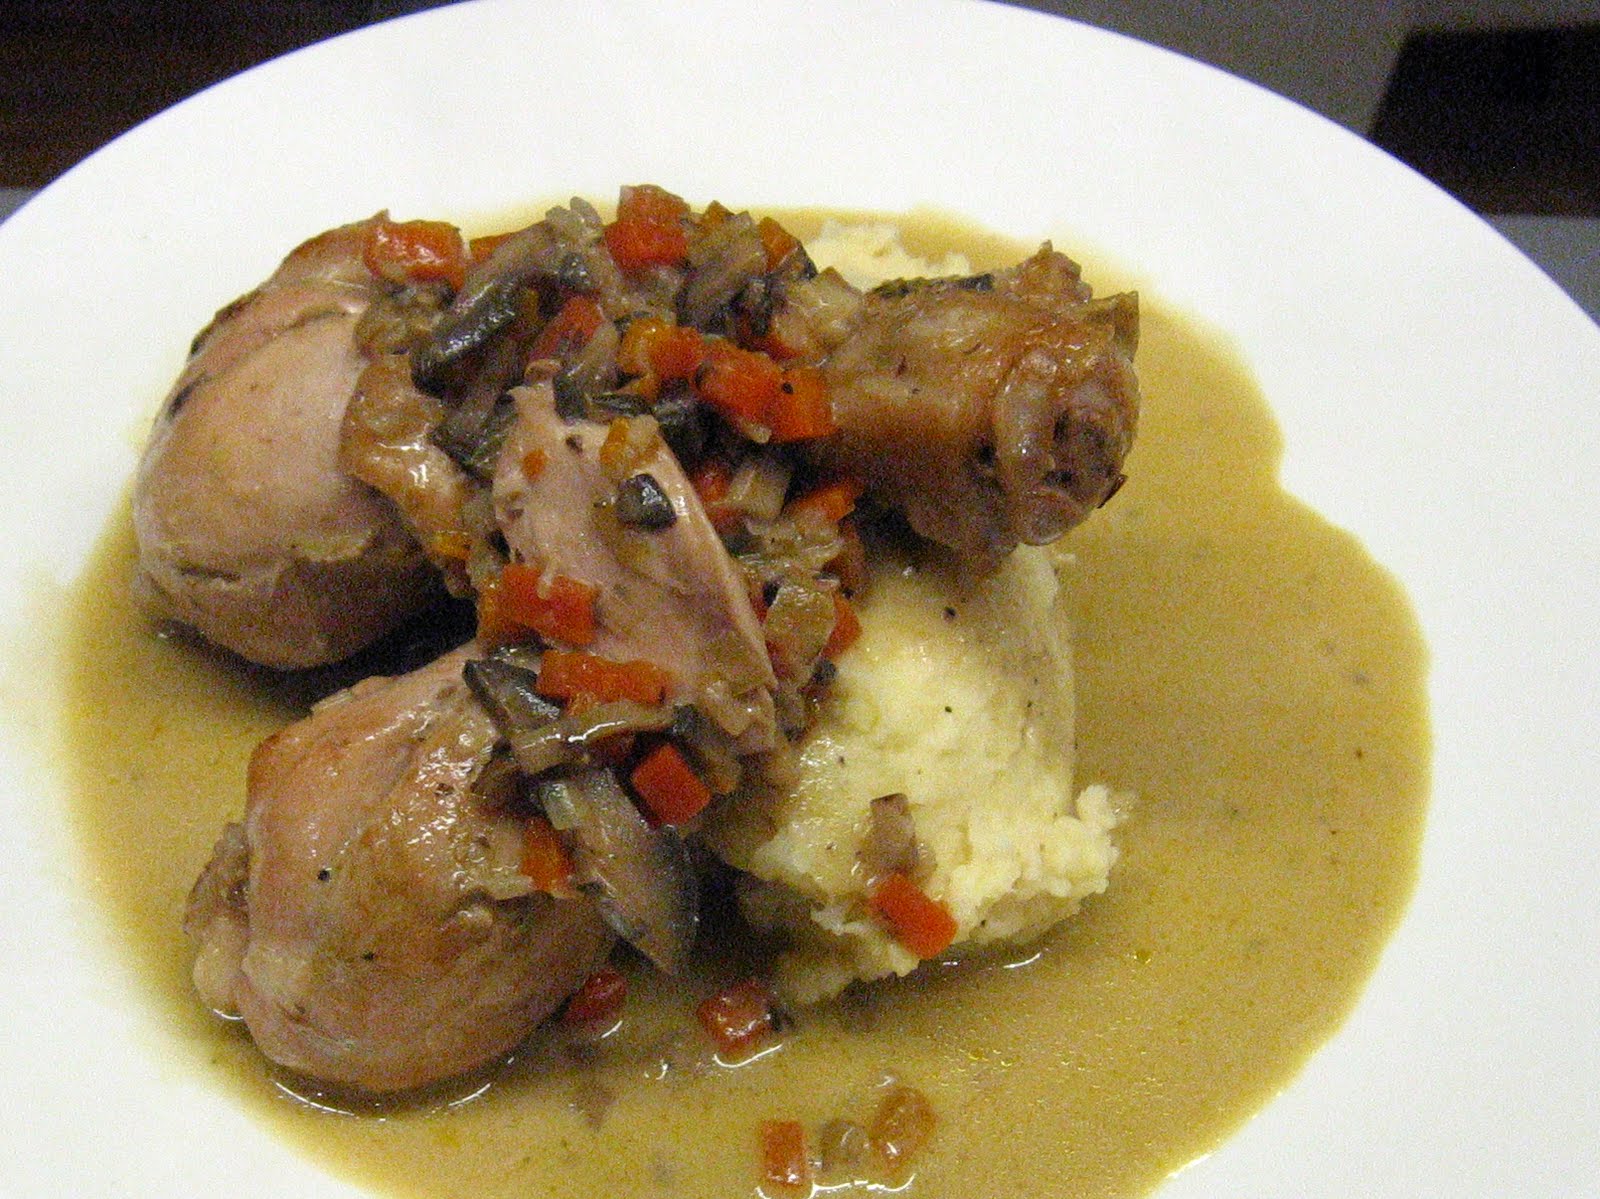
Chicken in cream sauce, and a couple extras


Sometimes you can't be bothered trying too hard for dinner. Tasty bacon, farm house cheese, rocket, onion and mustard in a hot toasted bun.


Mint Julep, oh so tasty


Some chicken stock with mushroom stalks and peel simmering to extract the mushroom goodness


Mixture of shallots, diced mushroom, carrot and herbs sweating down


Browned chicken added to the mix and topped up with some of the mushroom stock


The liquid was reduced and finished with some cream to make a sauce. Served on top of crushed potato and celeriac and smothered in rich creamy goodness.