Showing posts with label baking. Show all posts

Tuesday, August 18, 2015

Cheese Scones


There’s nothing easier and crowd pleasing to throw together when expecting company than cheesy scones. Best served warm from the oven with lashings of butter smeared on the flaky scone melting down the sides. My method is a little different to most I’ve seen, nothing drastic, the most important thing is not work the dough too much.

320 g Flour (2 cups)
188 ml Milk (¾ cup), plus extra for brushing
½ cup grated cheese*
75 g Butter (cold and cubed)
1 tsp Baking powder
1 tsp Baking Soda
6g salt (1%)
Dash of Cayenne or mustard powder

*The cheese should be a mixture of melting and flavour, so Edam and Cheddar for example, the quantity does not have to be precise.


  • Preheat the oven to 200ºC and line a sheet pan with non-stick paper.
  • Add half of the flour, all of the butter and cheese to a blender and blitz to a coarse breadcrumb texture, you could do this by hand if you wish.
  • Mix together the remaining flour, spice, salt, baking soda and powder in a bowl. Tip in the blended mix and combine.
  • Make a well in the centre and add the milk. Roughly bring together to form a dough mass, there will still be wet bits an unmixed flour, don't worry.
  • Tip the mixture out on to the bench and pat the mixture into a rough rectangle, fold into thirds, get the dry and unmixed sandwiched between the layers. Pat out again and fold into thirds once more.
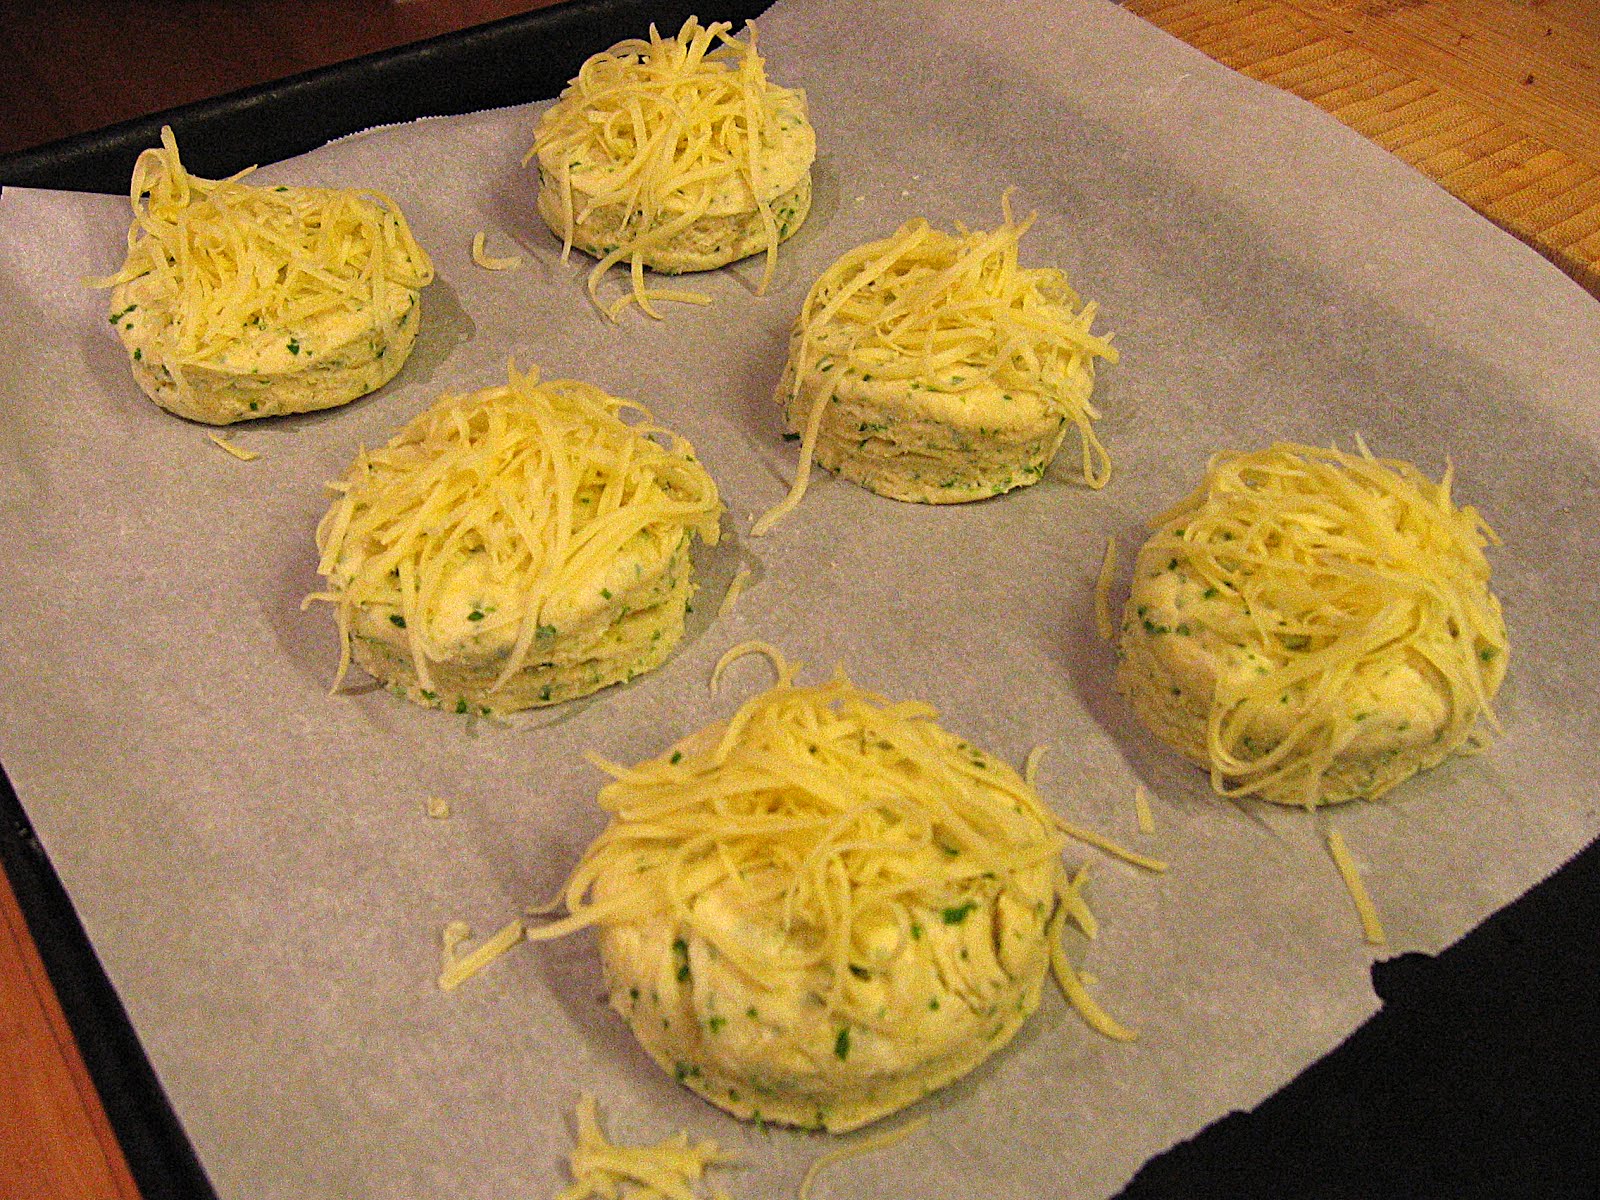
  • Pat, and roll the dough out to about 10–15mm thick. Using a 6cm round cutter, cut out circles of dough and place on the sheet pan. roughly push the scraps together so you can cut out the remaining dough.
  • Brush the top of the scones with milk and place in the oven for 10–15 minutes. Remove to a rack to cool when done.

Wednesday, June 3, 2015

Bath Oliver biscuits


Inspiration comes from many different places, I've recently finished rereading Brideshead Revisited, a book that regularly comes back in to my reading rotation, and for some reason Bath Oliver biscuits stood out to me, even though they are only mentioned in a passage in passing (below), so I set about finding out about and how to make them. I ended up finding a recipe I liked the look of on Ladies a Plate and adapted that for my use. These crackers store very well, which is what bought them to fame, not needing to reheat purchased crackers to get the desired crunch.

"We had bottles brought up from every bin and it was during those tranquil evenings with Sebastian that I first made a serious acquaintance with wine and sowed the seed of that rich harvest which was to be my stay in many barren years. We would sit, he and I, in the Painted Parlour with three bottles open on the table and three glasses before each of us; Sebastian had found a book on wine tasting, and we followed its instructions in detail. We warmed the glass slightly at a candle, filled a third of it, swirled the wine round, nursed it in our hands, held it to the light, breathed it, sipped it, filled our mouths with it and rolled it over the tongue, ringing it on the palate like a coin on a counter, tilted our heads back and let it trickle down the throat. Then we talked of it and nibbled Bath Oliver biscuits and passed on to another wine; then back to the first, then on to another, until all three were in circulation and the order of the glasses got confused and we fell out over which was which and we passed the glasses to and fro between us until there were six glasses some of them with mixed wines in them which we had filled from the wrong bottle, till we were obliged to start again with three clean glasses each, and the bottles were empty and our praise of them wilder and more exotic."
Brideshead Revisited, Evelyn Waugh

Bath Oliver biscuits
30 ml warm water
3g dried yeast
50 g butter
150 ml milk
5g salt
340g flour

  • Combine the yeast and water and set aside to bloom.
  • Gently heat the milk and butter together over a low heat, keep the temperature down, just warm enough to melt the butter.
  • Combine the yeast and liquid in a bowl and add half the flour.
  • Mix well, cover and let it rest for 15 minutes.
  • Combine the rested batter with the remaining flour and salt to form a ball of dough.
  • Knead the dough until smooth, allowing it to rest now and then.
  • Place into a clean bowl and cover tightly, allow it to rest for about 30 minutes.
  • Preheat the oven to 160ºC, and set up a rack in the top third and another in the lower third.

  • Roll out the dough into a rectangle about 2cm thick.

  • Fold into thirds and roll back out, repeat this 8 times. You will need to rest the dough every 2–3 folds as it will be resistant to re-rolling.

  • Roll the dough out to 5mm thick, dock the pastry all over, then using a cutter press out large circles.
  • Arrange on lined trays, spray the rounds with a light misting of water and sprinkle over some flaky salt.
  • Bake for 25 minutes, swap the trays over halfway through, until golden and crisp, this may take a little longer sometimes.
  • When cooked move the biscuits to a cooling rack and then store in an airtight container.

This recipe is based on one from Ladies a Plate

Wednesday, December 10, 2014

Cereal cookies


I may of tested one of these before taking the photo.

Cereal cookies
8 portions

100 g Butter
130 g Brown sugar
20 g Glucose syrup
1 Egg
100 g Flour
75 g Cereal
Pinch of Salt
1 tsp Baking powder
1 tsp Baking soda
1 tsp vanilla paste
  • Cream butter and sugar.
  • Beat in egg.
  • Mix in vanilla and glucose.
  • Sieve in flour, salt, baking powder and baking soda.
  • Mix together with cereal.
  • Portion out and place on lined tray several inches apart, you’ll probably need two sheet pans.
  • Refrigerate for at least an hour.
  • Preheat the oven to 190ºC.
  • Cook for 14–18 minutes.
  • Allow to cool on the pan before transferring to a cooling rack.
  • Will store for several days in an airtight container, or alternatively store in a zip-lock bag in the freezer, they can be eaten straight from the chiller.

Tuesday, September 30, 2014

Cookies


We’re not ones to keep ice-creams, cookies, cakes, biscuits and other sweet treats in the house, usually they’re bought with the intention of immediate consumption, and even if we did, I doubt they’d last. So when that sweet tooth craving happens upon me there’s usually nothing at hand, apart from the occasional candy, so I have a couple of go to recipes for a quick and easy sugary treats, cookies and fruit sponge are main culprits. I especially like the cookie solution as I can make up a batch and have a cling-wrapped log of dough in the freezer ready to slice off a few cookies to bake, rather than have a big batch of pre-cooked cookies, knowing my will power the entire batch would get demolished rather than enjoying one or two.

Cookies
300 g Flour
200 g Butter
100 g Sugar
6 g Salt
  • Cream the butter, sugar and salt together. 
  • Mix in the flour. 
  • Roll into a log shape using cling-film. 
  • Refrigerate for half an hour. 
  • Slice discs, thin or thick, up to you, arrange on a sheet pan.
  •  Bake at 180ºC for 10 minutes or so, depending on thickness.


Well that’s the basic cookie recipe, this latest batch I took about 100 grams of “burnt” hazelnut praline I had made a few weeks early and blitzed it until I had a good mixture of powder and chunks and combined that with the dough base. I also sprinkled the sliced cookies with some smoked salt before baking them.

Tuesday, July 22, 2014

Almond sponge with figs


It often surprises me when baking what a difference technique has, take a sponge cake for example, the basic being equal parts egg, sugar, butter and flour (a little baking powder, salt and vanilla). Cream the butter and sugar together, then add the eggs and flour and you have a pound cake, Whisk the eggs and sugar together, then add the flour and melted butter and voilà a sponge instead. Two quite different cakes, the same ingredients, same ratios, just put together differently.

This recipe should ideally be done by weight, but if you can’t be bothered weighing your eggs the minimum weight (NZ) for size 6 is 53g, 7 is 62g, and 8 is 68g.

200 grams Egg (3 size 7 eggs)
200 grams Sugar
200 grams Butter
150 grams Flour
50 grams Almond meal
6 grams Salt
1 tsp Baking powder
10 ml Orange blossom water
Jar of preserved figs (or fresh), quartered
Raw Sugar

Pre-heat the oven to 170°C.


Line the base of a spring-form cake tin with baking paper and coat the whole interior of the tin with butter. Sprinkle the base with raw sugar and arrange quartered figs.

Whisk the sugar, orange blossom water and eggs together until they have become pale yellow, and tripled in volume.

Sieve in the flour, almond meal, salt and baking powder. Gently fold through.

Melt the butter and stir in.

Pour the batter into the tin, tap the tin on the bench to remove any excess air bubbles.


Bake for 35–45 minutes, or until the cake springs back when lightly pressed and a skewer inserted comes out clean.


Allow to cool in the tin on a rack until it can be handled without burning yourself, remove the springform and turn out on to a serving plate.

Friday, January 10, 2014

Walnut Flat Bread


Well as I mentioned in my last post about chicken liver pâté I had also whipped up a batch of walnut bread and pâté de campagne, I’m afraid you’ll have to wait a little longer for the pâté de campagne recipe as this is all about walnut flat bread today. Also slightly off topic, I have finally got myself a proper URL, exciting huh, it was hard choosing exactly how to get “good food in a crap kitchen” into an address that was manageable but as I notice most people shorten me to “crapkitchen” I settled on www.crapkitchen.com terribly original i know!

Walnut Flat Bread (Makes 8)
700 g White flour
300 g Whole wheat flour
150 g Walnuts, finely chopped
600 ml Lukewarm water
20 g Yeast
20 g Salt

Stir the yeast into the water and let it sit for about 10 minutes for the yeast to activate, a good foam should form.


In a large bowl mix together all the other ingredients, make a well and pour the liquid into it. Form into a rough ball and leave to rest for 15 minutes. Tip out of the bowl and work the dough into a log about 60 cm in length, fold in half and repeat. Do this for about 10 minutes or until the dough is smooth and elastic, much like the method I use in my hand pulled noodles, you can knead traditionally if you prefer but I find this method is faster and creates a more elastic dough. Place the dough back in the bowl, cover and let rise for about an hour.

Preheat the oven to 180°C, on fan forced. Divide the dough into eight. Take a portion of dough and roll into a round, 2mm thick, repeat with the remaining dough, lay each round between cling film to prevent sticking. Bake each round in the oven for 15 minutes, you should be able to do two at a time if you have a fan oven. When cooked transfer to a rack and cover with a tea towel. The bread will crisp further as it cools.

Friday, August 16, 2013

Cookies


This is pretty much my go to recipe for cookies, these are not ooey gooey chewy cookies, they have a good snap and are perfect for dunking. Rolled into a log and wrapped tightly it freezes extremely well, meaning you can slice off rounds (with a hot knife) and have fresh biscuits cooked in about 10 minutes, no need to cook up the whole batch at once. Rounds rolled very thin and baked nice and crisp also make a great ice cream sandwich.

100 g butter
200 g sugar
200 g flour
1 egg
1/2 tsp baking powder salt

Cream the butter and sugar until pale light a fluffy, beat in the egg. Sieve in the flour, baking powder and salt, and work into the batter, this is also the perfect time to add any extras such as chopped nuts or chocolate, try not to overwork the dough.


Tear off a large rectangle of cling film and place the dough in a rough log shape in the centre, use the cling film to tightly roll up into an uniform log, a second layer can help. Place either in the freezer for future use or in the fridge for at least half an hour before slicing and baking for about 10 minutes in a preheated 180ºC oven. Cool on a wire rack, well that is if you can wait for them to cool before devouring.


When making cookies for an ice cream sandwich I’ll take a ring mold and press ice cream into it on a sheet of baking paper, then transfer to the freezer. Then slice a round of the cookie dough off and roll out with a rolling pin so it’s a little larger than the ring mold and nice and thin. Cook it just as above, but keep an eye on it as it will cook a little quicker.

Wednesday, July 17, 2013

Upside down apple cake


125 g Butter
125 g Sugar
1 Egg
1 tsp vanilla paste
1/2 tsp salt
50 g Cornflour
75 g Wheat flour
1 tsp Baking powder
1 Apple
Sugar and Butter to coat
  • Preheat the oven to 170ºC.
  • Grease a large ramekin with butter and sprinkle sugar on the base.
  • Peel and slice the apple very thinly, I prefer to use a mandoline for this.
  • Arrange the apple slices on the base of the ramekin.
  • Cream the butter and sugar together until the sugar has dissolved and the mixture is pale yellow and fluffy. Beat in the egg along with the vanilla.
  • Sieve in the salt, flours and baking powder, fold the dry mix in, take care not to overwork the batter.
  • Spoon the mixture into the ramekin and try not to disturb the apple layer.
  • Bake for 45 minutes, until a skewer inserted comes out clean.
  • Run a knife around the edge of the cake and turn out onto a plate. Enjoy with lashings of cream, whipped or not.

Saturday, October 6, 2012

Bread, again


Bread is one of those basic staples everyone should know how to make, it’s easy to learn, and takes a lifetime to master. The most simple and basic of loaves is 1 kg flour, 600ml water, 30 grams yeast, and 20 grams salt, mix, knead, let it double in size, shape, rise again and bake. Simple. But there is so much more to the humble loaf than just that set of ratios and steps, you can increase the hydration, add fats to enrich the dough, let the dough ferment for longer, add vinegar, whip it in a beater, not knead it at all, the ideas are limitless when it comes to bread making.

Hydration is probably my favourite way to experiment with bread making, it significantly changes the texture of the crumb, go high enough and the baked bread has an almost plastic-like interior, and you can achieve some pretty light loaves. I’ve also been interested in the order that the loaf is made, does it have to be mix; knead; rise; punch down; shape; rise; bake; or could I let it rise once, then whip it with a dough hook in the beater?

When adding fat, you have to be careful when in the process it is incorporated, too soon the fat will coat the flour and prevent gluten formation, so you’ll end up with a denser shorter crumb, in saying that though, if the total fat is less than 5%, it shouldn’t matter when you add it. If the fat is greater than 5% it’s best to add it after you have given the dough a good knead, so the gluten has already formed. Adding fat to your dough will give you a softer, finer crumb, usually a softer crust too, not to mention the richness it adds.

I recently made a standard 100/60/3/2 ratio bread (see above), with a bit of butter and a longer ferment, it went down a treat.

The night before in a bowl mix together 200 ml of warm water and add 5 grams of yeast, stir it to dissolve. When the mixture begins to foam, stir in 200 grams of flour. Leave overnight, or 24 hours. Leaving the starter to develop adds a pleasant sourness to the bread.


The next day dissolve 10 grams of yeast in 100 ml of warm water, and then add that and 300 grams flour to the starter. Mix together and knead for a good 10 minutes, until smooth and elastic. This is a lot easier with a beater, but you should be able to manage it by hand, mix (or in a beater with a dough hook) in 100 grams of room temperature butter bit by bit. Once it is incorporated let the dough rest for about half an hour, or until it had doubled in size. Punch the dough down, and then shape and let it double in size again.


Preheat the oven to 220ºC. Before putting the dough in, pour half a cup of water on to the bottom of the oven to create some steam. Put the dough in the oven, and turn the temperature down to 200ºC, cook for about 30 minutes, or until it sounds hollow when tapped on the bottom, or until the internal temperature is 90–94ºC.

Tuesday, June 12, 2012

Cardamom palmier


I had a lot of leftover puff pastry after topping off my pies, instead of putting it in the freezer and forgetting about it, and only finding it when I have a dig around the tiny tiny freezer some months later, I decided some sweet buttery pastry cookies were in order. It is a great way to use up leftover pastry, or a good excuse to make some pastry.

Sugar Mix
¾ cup sugar
1–2 tsp ground cardamom, depending on personal taste (grind your own for the best result)
1 tsp salt
  • Preheat the oven to 190ºC.
  • Combine all the ingredients and mix well in a bowl.
  • Roll out the pastry into a rectangle, using the sugar generously to prevent sticking, much like you would with flour.
  • Sprinkle sugar over the pastry, coating it evenly.
  • Firmly roll up one edge of the pastry into the center, and repeat with the opposite edge.
  • Cover with clingfilm and refrigerate for about 20 minutes, so the pastry has a chance to firm up.
  • Cut 5 mm slices and arrange on a baking tray. They will spread slightly so leave enough space around each to allow for this.
  • Bake for 10 minutes, then sprinkle with sugar.
  • Bake for about 10 minutes more, or until golden brown and crisp.
  • Cool on a rack, and when cool, store in an airtight container.

Thursday, May 24, 2012

Puff Pastry


Plans dreamed up during the day in the odd moment I have spare, rarely end up as that night's meal, either lack of ingredients or time. I had great plans of making a dashi-chicken broth, whipping up some of McGee’s alkaline noodles, and serving with a hamine egg and shredded chicken, but it just seemed a bit too much for a Monday night after work. So instead I whipping up a couple of oxtail pot pies, a thick rich stew topped with a pastry shell.

The stew was a pretty simple, chuck together of oxtail, red wine, swede, potato, carrot, onion, garlic, anchovy, brandy, caraway, bay leaf, thyme, mustard, salt and pepper. Just brown up the meat, then the onions, deglaze with the brandy and wine, then add the rest, put it in the cooker on high pressure and wait, or simmer away on a stove until the meat is tender and the cooking liquid reduced to a thick luscious gravy.

So while the meat was cooking, I got onto the pastry. I’ve never made my own puff pastry, I make shortcrust quite often, but I always thought puff must be hard, anyway I had the idea of pot pie, I wanted a pastry crust, and like heck I was going to buy it. After some research, I was pleasantly surprised just how easy it seemed, the main theme I read, was to make sure to keep the dough cool, so the layers of folded pastry don't meld into each other. Apart from that it seemed like any other pastry, just folded and rolled a bit more.

Ingredients
200 grams Flour
1 tsp Salt
200 grams Butter (unsalted)
120 ml Water (Cold)

Dough
  1. Sieve the salt and flour into a bowl.
  2. Work the butter into the flour with your fingers, you want a large bread crumb type texture but still have some large pieces of butter in there.
  3. Pour in about half of the water and work it into the butter/flour mixture, adding more water if needed, you want a firm dough that's not too sticky.
  4. Cover and put it in the fridge for 20 minutes.

Rolling
Roll the dough out in one direction, keeping the edges straight, and trying to make it as rectangular as possible.


Fold the bottom third up, and then the top third down, and roll out again to the original size. Repeat two or three times more, on the last repetition stop before re-rolling, cover and place in the fridge for another 20 minutes. If the dough gets too soft during the rolling process pop it back in the fridge for a couple of minutes.


Remove the dough from the fridge and roll out to a couple of millimeters thick. Cut out the desired shape with a sharp knife, you don't want to pinch the edge together with a dull knife as it won't puff properly.

The amounts in the above recipe was more than enough for the two pies, and a healthy number of Palmiers.

Wednesday, February 22, 2012

Yoghurt Scones


We don't have milk in our house, unless we plan ahead and specifically know a dish we're making needs it. We don't have anything against the stuff, it's just that we don't drink it, don't put in our coffee, and don't drink tea often enough to justify buying it. On the odd occasions we do have it, it's been in the fridge so long it's off. So please, don't ask for milk in your coffee.

Feeling rather peckish for a savoury snack I was racking my brain trying to think of what to eat. Nothing appealed, a pantry full of food, a freezer stuffed to bursting and plenty in the fridge, but nothing was going to hit the spot. When finally I decided on a spot of baking, maybe some crackers, nope they wouldn't do, scones, damn no milk, but I have yoghurt, surely that would do.

Pre-heat the oven to 200°C.

In a food processor pulse together 215 grams of flour, 2 teaspoons of baking powder, salt, 50 grams of butter, a third of a cup of grated cheese and a bunch of parsley.

Tip the flour mixture into a bowl and make a well in the center, pour in a half a cup of yoghurt (plain natural yoghurt, none of that crap with gelatine and thickeners etc.) Quickly work the yoghurt into the flour to form a dough, do not work the dough too much.


Tip the dough on to the bench and roll it out so it's one inch thick. Cut out rounds with a 6 cm (2 & 3/8 inch) cutter. Place them on a tray and top with some grated cheese and bake for 15 minutes. Remove the tray from the oven and let the scones cool on a tray a little, before cutting in half, slathering with butter and devouring.

Monday, November 28, 2011

Peanut butter biscuits


I don't have much of a sweet tooth, give me cheese and crackers (or maybe oatcakes) any day over a piece of cake. But I had a hankering for cookies. Unfortunately our pantry is rather lacking when it comes to the sweet side of baking, but I did happen to have a bit of peanut butter left in the pantry so all was not lost.


I made a pretty basic cookie dough 1 part sugar, 2 parts fat and 3 parts flour.

50 grams white sugar
50 grams muscovado sugar
150 grams butter
50 grams peanut butter (more if you want a stronger peanut flavour)
1 egg
1/2 teaspoon vanilla
1/2 teaspoon baking powder

Pre-heat the oven to 180°C, don't use fan bake.


Cream the butter, sugars and peanut butter until pale and all the sugar is dissolved.


Mix in the egg and vanilla.


Sieve in the flour and baking powder (I used salted butter, if you're using unsalted add 1/8 teaspoon of salt here).


Roll the dough in to balls (I got 22 in total) and flatten with the palm of your hand, or roll out and use a cookie cutter.


Sprinkle with a mix of sugar and cocoa. Bake for about 12 minutes.

Transfer the cookies to a cooling rack.

Now you can let them cool on the bench if you like a slightly chewy cookie, but I like mine crisp, so I put the cooling rack back in the oven (turned off) with the door ajar to dry out.

Monday, August 15, 2011

Snow, muffins and toddy


Well the snow set in yesterday, and it's still going, and apparently will be all week. So it felt like a good excuse to get some baking done. And an even better excuse for a Hot Toddy, it only seems appropriate to drink one when there's a coating of snow on the ground. I made mine with a cinnamon stick, orange peal studded with cloves, calvados, honey and hot tea.


With the Hot Toddy warming me up I started on a batch of savoury muffins.

The basic recipe I use is, 2 cups flour, salt, 150g butter, 3tsp baking powder, 1 cup milk, 1 large egg (makes 12). To this I add sweet or savoury ingredients (add sugar to the mix if you're making sweet muffins).
  1. Pre-heat the oven to 180°C
  2. Place dry ingredients in a bowl.
  3. Slowly melt the butter on the stove.
  4. Brush the muffin tin with some of the melted butter and dust with flour, knocking out the excess (if you're not going to butter your tin, reduce the amount of butter to 125g).
  5. Mix the milk in to the butter, then lightly beat the egg in.
  6. Put the filling ingredients in to the dry bowl. (I used corn, paprika, bacon, diced shallots, grated cheese, corn-meal (or instant polenta) and grated garlic(on a micro-plane).
  7. Beat the wet in to the dry ingredients adding more milk if needed.
  8. Divide mix in to the muffin tin.
  9. Bake for about 20 minutes, you can check easily by pressing down on a muffin and if it springs back it's likely to be done, Other wise stick a skewer in and if it comes out clean they're done.

Out of the oven and cooling for 10 minutes before tipping out and placing on a rack to cool.


Perfectly cooked and moist.