Wednesday, April 6, 2016

Spicy dressing for cool crisp things


This is a mind blowing, can be sinus clearing, awesome dressing for celery and spring onions, or tossed though some noodles, spooned over steamed rice, really anything that needs a helping hand.

1 Tbsp Soy sauce (Japanese)
1 Tbsp Sesame oil
1 Tbsp Rice vinegar
1 tsp Sugar
1 tsp Chilli in oil*

Mix all together and store in a air tight jar until ready to use. Toss through some sliced celery and scallions topped with some roasted peanuts, makes a great refreshing side dish for a salty main.

* You can use just chilli oil, or fried chilli in oil, or chilli crisp. I make my own chilli oil, fill a jar about halfway with toasted chilli flakes (roast whole chilli in the oven until fragrant and blitz), top up with grapeseed oil, stir and bang to get rid of air pockets and fill up with oil, leave for at least a month. It's the chilli solids at the bottom of the jar I use for this recipe.

Monday, March 21, 2016

Pork Schnitzel


Schnitzel, the porky kind, but works equally well with beef, if you’re a traditionalist, is a pretty easy throw together kind of meal, ideally you’ll be getting the crumbing done an hour or so before cooking so it has a chance to set in the fridge. And don’t be afraid of the oil, yes this is shallow fried, yes fried foods are not every day foods, but it’s not really all that bad for you.

We had this golden crunchy schnitzel with a fresh salad, tomatoes and herbs (and herb flowers, thyme flowers are awesome) straight from the garden and heart of celery leaves torn up, red onion a vinaigrette of cider vinegar, garlic and olive oil bought it all together, I like a bit of acid kick with fried foods. Not pictured but essential in my opinion is a good schmear of hot english mustard, there is something about crumbed meat and that hot nasal clearing condiment that works oh so well.

Stage one, preparing your meat.
  • Get three bowls and a sheet pan ready, also clear a shelf in your fridge.
  • Bowl one, add about a cup of wholemeal flour, a good pinch of fine salt, white pepper and sumac, mix together.
  • Bowl two, beat 2 eggs with a pinch of salt until homogeneous.
  • Bowl three, add enough breadcrumbs, I prefer panko.


Place the schnitzel in the bowl of flour and toss, ensure the meat is completely coated. Shake off any excess.


Transfer the floured meat to the egg bowl and coat, don’t leave any dry spots.


One at a time, take the meat from the egg mixture, shake off any excess liquid and lay on top of the bread crumbs, press down, flip and press down again, make sure there is an even coating, transfer to the sheet pan and repeat with the remaining meat.


Place the sheet pan in the fridge for at least half an hour.

Stage two, cooking your meat.
Set up your cook area, place a rack near by to drain the cooked schnitzel and put a pan on a medium high heat, I use a 12 inch cast iron skillet to cook with. Pour in about an inch of oil into the pan, rice bran is a good inexpensive neutral oil to use (much better than canola), heat the oil to 190ºC, you can test with a cube of bread by placing it in and seeing if it fries up golden brown, it shouldn’t take long to heat up.

Carefully place one or two pieces (depending on size) of schnitzel in the pan, laying away from you to avoid splashes, and cook for 90 seconds per side, when cooked transfer to the rack to drain, repeat with the remaining schnitzel.

Tuesday, March 1, 2016

Chicken and Waffles


Savoury and sweet sometimes it's an odd combination to get your head around, no doubt it works and works well, especially sweet and salty, bacon and maple syrup, salty licorice candy, fruit paste and cheese, to name a few easily reconciled combinations. But there are some combinations that at first thought just kind of make your brain kind of go hurrrrr, not that they should, take fried chicken and waffles, perfect crunchy on the outside chicken with nutty crisp waffles doused in syrup, no harder than sweet and sour pork to understand right? Maybe it’s the obvious mash up of dessert and mains that I have the psychological barrier with, but I don’t feel the same about bacon, pancakes and syrup, but then maybe bacon transcends course definition altogether and just is. Anyway, enough rambling, here's my version of chicken and waffles, the starch instead of flour in the dredge keeps the chicken crisp and the masa adds a wonderful flavour. Pickle juice in the brine was a revelation, it really picks the chicken up.


Brine (baker's percentages)
100% Buttermilk
50% pickle brine*
4% salt
3% chilli powder
1% smoked paprika

* If you don't want to use pickle brine, just skip it, but keep the salt at 4%. We want the salt levels at about 3–5% by weight, and the above percentages are best guess to what the pickle brine is bringing to the party.


Dredge
250g potato starch
150g masa
1% salt (4g)


Fried Chicken
Chicken thighs are the best cut they are juicer and have more flavour. Use boneless thighs, if you feel confident and want to save a few bucks, buy bone-in a do the work yourself (the difference is usually $5/kg here in NZ).

The night before:
Mix the brine together and add the chicken thighs, refrigerate for at least few hours or overnight.

Ready to cook:
  • Mix the dredge together in a bowl, pass it through a sieve.
  • Remove the chicken from the fridge.
  • Get a fryer on, or a heavy base pot on the stove over a medium-high heat with a few inches of rice bran oil (or other frying oil), you want to get the oil to 190ºC before cooking.

Cooking:
  • Get a rack ready for the cooked chicken.
  • Pull a couple of thighs out of the brine and shake off any excess liquid.
  • Toss them in the dredge making sure they're coated all over.
  • Shake off any excess dredge and carefully place the chicken in the hot oil, make sure to lay it away from you so it won't splash back at you. My cast iron pot isn't huge so I only do 2 at a time.
  • Cook for 3–4 minutes, they should be cooked through and be golden brown, a good indicator is when the the bubbling starts to slow down.
  • Move the cooked chicken to the rack and leave to rest, they’ll stay nice and crispy thanks to the potato starch (DO NOT "drain" on paper towels, they are the enemy of all crispy fried foods).

Serving:
Well it’s really up to you, fill up a bowl of chicken goodness with lashings of hot sauce, share or don't. But I do suggest you try the combo of chicken and waffles at least once, below are the steps for my version, a whole wheat waffle and crispy fried chicken doused in zesty spicy syrup, topped off with some fresh pickled daikon to cut through the richness and a bottle of Tapatío hot sauce on the side to give a little extra chilli kick.


Pickled Daikon
Daikon
1 part mirin
1 part cider vinegar
salt

Mix together the mirin and vinegar, season with the salt, the daikon is a little bitter so a little extra salt won't hurt. Cut a 6 inch length of daikon off and peel, use a mandoline or speed peeler to cut thin ribbons, stacking them as you go. Cut lengthwise into fine strands. Toss the daikon in the vinegar mix, cover and let sit for about an hour. When ready to serve, remove the daikon from the liquid and squeeze out any excess liquid.


Zesty spicy maple syrup
100 ml Maple syrup
1 Lime, juice and zest
Chilli flakes
Salt

Add the lime juice and zest along with the syrup to a pot and place on a medium-low heat. Add chilli flakes to taste. Allow to simmer and infuse for a few minutes. Taste and add salt accordingly, a small pinch, grains, should do, just enough to take the super sweet edge off.


Waffle mix
150g Whole Wheat flour (~1 cup)
250ml buttermilk
1 tsp Baking soda
1 tbsp rice bran oil
1 egg
1.5 g salt

  • Combine the dry ingredients in a bowl and make a well. Whisk the wet ingredients together and pour into the bowl. Fold together, don’t over mix.
  • Lightly grease the waffle iron and cook as per your cooker. Transfer to a rack in a warm oven (~50ºC), if preparing well in advance transfer to a rack to cool, and then reheat in a warm oven later.

Monday, February 15, 2016

Odd flavour sauce


I try hard not to post recipes from books or that others have created as I feel it is important to keep this site my own content as much as possible, in saying that anyone who follows me on Instagram will see I am going through a bit of an Asian phase at the moment, I blame 101 Easy Asian Recipes by the good people behind Lucky Peach, it’s truly an awesome book that has certainly educated me, the section on pantry staples has certainly made trips to the local Asian marts a lot more enjoyable, I actually feel like I know what I'm seeing on the shelves now. Aside from the chineasy cucumber salad, cold spicy celery, and my now go to chicken dish, Adobo chicken, I am obsessed with the Odd Flavour sauce contained within the pages, it goes with friggin everything and makes a dish taste better than the sum of it’s parts. Lacquered Roast Chicken with the above sides, rice and this sauce is heaven, a perfectly cooked pork chop with rice and the sauce is a quick throw together meal that certainly punches above it’s humbleness. The sauce has a good chilli kick and numbing heat from Szechuan pepper, just the right balance of sour and salty, and that nutty sweetness you get from tahini.

So a recipe entirely not by me but from the pages of 101 Easy Asian Recipes by Peter Meehan, go buy a copy.

Odd Flavor Sauce
3 Tbsp soy sauce
2 Tbsp tahini*
1 Tbsp Chinkiang vinegar
1 Tbsp sesame oil
2 tsp sugar
¼ tsp kosher salt
3 Tbsp neutral oil
1 small spring onion, finely chopped
1 Tbsp Ginger, minced
1 Garlic clove, minced, 1 tsp
½ tsp chilli flakes**
½ tsp Szechuan peppercorns, crushed

* Sub in peanut butter if you don't have tahini.
** More if you desire, but don’t go crazy

In a heat proof bowl mix together the soy, tahini, vinegar, sesame oil, sugar and salt. You’ll want the tahini to be pretty well mixed through and the sugar mainly dissolved, I find a fork better than a spoon.

Heat a small pot over a medium heat and add the neutral oil. When the oil is shimmering hot remove from the heat and add the spring onion, ginger, garlic, chilli and pepper, stir for about 10 seconds until aromatic. Tip into the bowl. Mix together and transfer to a jar.

Will keep a few days in the fridge.

Wednesday, February 10, 2016

Season your steel


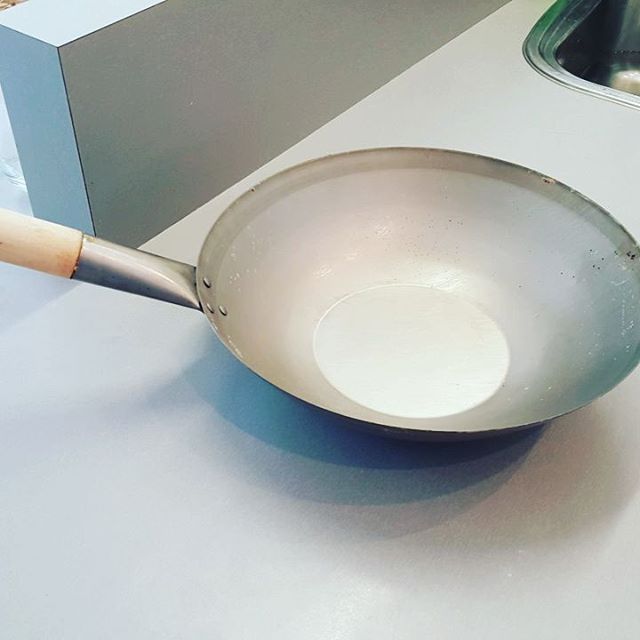
I've just recently picked up a new wok for home from the local Asian mart, a decent pan shouldn't set you back too much, I paid NZ$20, my other steel sauté pans have cost a similar amount from a hospo wholesalers. These pans are the work horses of the kitchen, meant to take abuse and do the heavy lifting, but there's no such thing as a free lunch and a little bit of effort has to be put in before you reap the benefits, and a maybe little on going care, mainly don't scrub the shit out of them with steelo and avoid soap, hot water and firm scrubbing brush are all you need, if it's really caked on crap—which if seasoned properly shouldn't happen—pop it in a moderate oven to soften before scrubbing.

This is by no means meant to be a definitive expert guide, this is how I season my steel pans. A few things before we get started, don't do this on a still day, there will be smoke, a lot of it, good air flow is a must, don't rely on your range hood it's a piece of crap, all domestic extraction systems are, deal with it. Flax seed oil is the best option for seasoning, there are many articles of the web about why if you're interested Google is your friend, if you don't have or want to use it use something neutral, grape seed or rice is fine. Finally give yourself a bit of time, I'm not talking all day, but a good hour or so.


First things first, wash the pan you're going to season, I mean get in there with hot soapy water, a scouring pad and a whole heap of elbow grease, more likely than not the pan is going to have a pain in the ass to remove plastic type coating inside and out, get this off or it will smoke and send noxious nightmarish fumes everywhere.

Fill up the sink with cold water, this is important for two reasons, you're going to shock the pan after getting it white glowing hot, and well if you burn yourself you have a big ol' sink of cold water to dunk into.

Get a rag or cloth, something that won't melt and you don't care too much about, an old cotton tea-towel is ideal, roll it up and fold it in half, you'll use it a bit like a brush to apply oil, which you should also put a few slugs worth in to a bowl, you can always add more.


Place the pan on a high flame, you want to get it hot all over, you may need to move the pan around, the metal will begin to change colours, darkening, turning red, then blue, finally becoming white hot. Don't rush this, you want it to be uniformly "white hot" all over. When ready dunk it in the water.


Dry the pan off. Use the rag to apply a thin layer of oil all over the inside of the pan, put it back on the heat, again you may need to move it around as you want it to get uniformly insanely hot all over.

When the oil has finally stopped smoking, use the rag to apply another thin layer of oil to the pan, leave it on the heat when applying, it will be very hot so be careful, and as above get it as hot as it will go and when it stops smoking apply another layer. Repeat this step five or six times, you want it to be black all over.


You can either leave it to cool down naturally, I don't, or dunk it in the sink of cold water, weirdly satisfying, dry it off and you're done.

Wednesday, February 3, 2016

Cold tofu snack


With the mercury, here in the capital, heading up past 31ºC today, it's already well past that at home in Karori, something cooling, refreshing and tasty is in order. Quick and easy is a must too, it's not too much fun being stuck in the kitchen on a stinking hot day, I mean stand in the garage because it's the only cool spot in the house kind of day. Well this scores on all points, it's super simple (slice some tofu), packs a flavor punch, and it's cooling to boot.

Silken tofu (cold from the fridge)
Togarashi*
Soy (Japanese)
Lime juice and zest

Slice the tofu and arrange artfully on a dish. Pour over the soy sauce, about 2 tablespoons, letting it pool underneath. Zest the lime over top, and squeeze the juice violently over the tofu letting some of the flesh escape and scatter across the soft pillows of soy curd. Sprinkle generously with Togarashi. Devour with abandon, chopsticks are your friend and will make you look less like a brute as you scoff it down.


* If you don't have any Togarashi you could do what I do in a pinch, zest a tangelo (or orange), toast some sesame seeds and chilli flakes and mix together.

Tuesday, February 2, 2016

Courgette and mint salad


One thing we are never short of in the garden is mint, we have two plants, a standard mint and a basil mint, and they just grow grow grow, you can cut them back, abuse and misuse them but they just keep growing and if kept unchecked I'm sure would take over the garden. This salad will take good advantage of a glut of mint, and add a good zing to fresh crisp courgettes, we got ours in the garden a bit late, but buds are coming so hopefully we’ll get a late crop. The salad is bright and zingy that really highlights fresh courgettes and is perfect on a hot summer's day.

4 decent sized courgettes
Handful of mint leaves and tips
1 Lemon
Olive oil
Chilli flakes
1 Garlic clove
Flaky Sea salt (or kosher)
  • Get a griddle pan on a high heat.
  • Slice the courgettes as thin as you can, or use a mandolin (I used the second thinnest setting).
  • Griddle the slices on one side until charred.
  • Arranged cooked slices on a board in a single layer, don’t stack them or they will steam.
  • As they are cooling sprinkled with salt.
  • (Optional) Slice the lemon in half and griddle until caramelised.
  • In a large bowl squeeze in the juice from the lemon and add olive oil, I like a 2 parts oil to 1 part juice but do it to your own taste.
  • Finely mash or grate the clove of garlic into the bowl, and add chilli flakes to taste.
  • Take the larger mint leaves and thinly slice and add to the bowl.
  • Toss the courgettes through the dressing, use your hands, taste and adjust the seasoning.
  • Let it rest 10 minutes or so before plating up.
  • Arrange on a plate and sprinkle over the mint tips.

Tuesday, January 26, 2016

What a break!


Alfie in the Sounds looking like a salty sea dog


Lacquered Roast Chicken

I hope everyone has had a good long summer break, I managed to snag myself 7 weeks off this summer, the longest break I've ever had, it has been great spending so much time with the little sprog. My twitter, Instagram and blog have been a little quiet during this time, mainly because I haven't had much time at home in my kitchen, I got to spend a few days in the sounds and Alfie got his first fishing trip, which he promptly fell asleep during. As per usual over the festive days, I ate too much and probably imbibed a few too many and then back at home everything has been light and easy.


Jap Chae


Chicken adobo

A few highlights over the weeks were butterflied leg of lamb, heavily seasoned with garlic and rosemary, barbecued hot and fast with a good rosemary smoke, great Xmas lunch. Getting a copy of 101 Easy Asian Recipes by the good people at Lucky Peach, it’s pantry section made the stock up trip to the local Asian markets a little less confusing, I've been slowly working my way through the book and have a few favourites already and list of what to try next, managed Chineasy Cucumber salad, very awesome, Chicken Adobo, crazy amount of soy and surprisingly very tasty, Jap Chae, far far tastier than the recipe reads, Korean grilled chicken, and Scallion salad. Have also discovered a new favourite snack, silken tofu, lime juice, soy and togarashi, simple and delicious, especially on a hot summer day.


Chineasy cucumber salad


Scallion salad

Well time seems to fly, the seven weeks are almost up, best laid DIY plans didn't quite come to fruition, well I made a coat rack, woo. Alfie is far more mobile than ever and I spend most of my time chasing after him, he managed a flight of stairs! So one week left and back to work, not even sure if I remember what that is at this stage.


Korean grilled chicken


Silken tofu snack

I managed a whole half day at work and ended up in hospital, I seem to have all the luck, I’m out now, a nasty case of gastritis, which means I am yet again on a ruddy restricted diet, avoid spicy, crap, no coffee on an empty stomach, how am I meant to function! Oh well, time to look for the silver lining. At least I’m back at work, happy and healthy, and I had an unplanned extended break even if some of it was at the pleasure of the local DHB.

Time to see what 2016 has in store and dive back head first into some kitchen creations. 

Tuesday, December 1, 2015

Sopressa puttanesca


This is one of those get it all into the pot and let it see to itself for a couple of hours, fats and oils mingling together, textures softening, flavours intensifying. When you’ve finally had enough torture and can’t hack the mouth watering aromas filling the house, you just need to give a final adjustment to the seasoning, get it off the heat and devour, spaghetti is fine if you can’t be bothered with the gnocchi, but the fluffy pillows of potato really do lend themselves well to this sauce.

Sopressa puttanesca
Olive oil
Olives, stoned
Chilli flakes, to taste
Garlic, diced
Capers, rinsed
Sopressa, grated!
Capsicum, diced
Red onion, diced
Tomatoes, 1 can
Cider vinegar
  • Get a generous glug of olive oil in a heavy pan over a medium heat, add a bit more, put in the grated sopressa and gently let it come up to temperature and release it’s oils.
  • When it’s all sizzling away add in the garlic, onion and capsicum, cook until translucent.
  • Splash in a little vinegar, and cook out.
  • Add the chilli, capers, olives and tomatoes, cover and reduce the heat to low. Cook for a hour or two.
  • Adjust the seasoning, salt, chilli, vinegar, and let cook out for a few more minutes before double checking.


Gnocchi
60g potato flakes (1 cup)
300 ml water
1 egg
4 g salt
  • Mix well, transfer to ziplock bag and let rest for at least half an hour.
  • Get a large pot of salted water on to boil.
  • Nip of the corner of the bag and use scissors or a knife to cut of portions as you pipe into the water.
  • Cook until floating on the surface and transfer to an ice bath.

Getting it all together
  • When ready to serve, get a sauté pan on a medium heat with a glug of olive oil and a knob of butter.
  • Sauté the gnocchi until beginning to crisp, ladle in some sauce and toss through, repeat until enough sauce is added.
  • Serve in bowls with a generous grating of hard cheese.

Wednesday, November 4, 2015

Salt baked swede


Swedes, rutabaga, or whatever you choose to call them, I'm guessing you fall into one of two categories, love them or hate them. Much like the often maligned brussels sprouts there doesn’t seem to be much middle ground or indifference to them, you’re either excited to have them on your plate or someone will of offended you greatly. Unlike the sprout, which on inspection you have reasonably good idea of what flavour it’s going to be, it looks like a mini cabbage and is probably going to taste a bit like one too, the swede however is a root vegetable carefully hiding its true flavours, which is pretty pronounced cabbage, so yay for Brassica lovers.

It’s a pretty versatile vegetable, it works well raw, grated with some garlic hot aioli as a remoulade, sliced thin and stir fried, baked in fat with a roast, steamed or as below baked in salt to really intensify the flavour, sliced into wedges and served with some peppery hot olive oil.


Salt crusts are reasonably straight forward, dump a lot of salt into a bowl and crack in a couple of egg whites, mix together to make a wettish sandy mixture. Make a layer in the bottom of the roasting dish, nestle in the peeled swedes and firmly pack with salt making sure there are no gaps. Bake at 170ºC for about an hour, a little longer won't hurt. Remove from the oven and let rest for 10 minutes or so. With the back of a knife, crack the crust open like an egg and gently wrestle the swedes free.