Showing posts with label chicken. Show all posts

Friday, July 1, 2016

Chicken and Egg


Cold winter nights call for warm comforting food, savoury flavours, a deep richness. Being a fan of all things fried, crumbed, dredged and satisfying in their unctuousness, schnitzel makes quite a showing over the colder days, not that there seem to be many this winter, pork is always one of my favourites, especially with lashing of nose tingling hot mustard, chicken is a close second, a breast butterflied and crumbed is probably the best use for that piece of meat, it’s cooked quickly and stays juicy even though thin, thighs work just as well but are a little bit more work.

There’s not a whole to the flavour of chicken, so it’s best to use it as foil to build on, in this case I was really going for an umami bomb. The chicken is dredged in seasoned flour, then dipped in an egg wash laced with shiro miso, and coated in seasoned panko. I like to keep the oil I fry in quite neutral, butter just messes up the flavour, I did contemplate it though, so grape-seed was used, a good half inch deep, don’t skimp, it prevents burning and having enough oil ensures you can keep a good temp and stop the coating soaking it up due to temp drops. The chicken should only take a couple of minutes each side, when golden remove to a rack.

While the chicken rests to the side heat up a skillet with a knob of butter and spoon of shiro miso, when the bubbling subsides give the pan a swirl and slide a cracked egg in. cook until the whites are set and yolk runny. Place the cooked chicken on a plate and slide the egg, miso buttery pan juices and all, on top and finish with a grate of some aged sharp salty cheese.

Tuesday, March 1, 2016

Chicken and Waffles


Savoury and sweet sometimes it's an odd combination to get your head around, no doubt it works and works well, especially sweet and salty, bacon and maple syrup, salty licorice candy, fruit paste and cheese, to name a few easily reconciled combinations. But there are some combinations that at first thought just kind of make your brain kind of go hurrrrr, not that they should, take fried chicken and waffles, perfect crunchy on the outside chicken with nutty crisp waffles doused in syrup, no harder than sweet and sour pork to understand right? Maybe it’s the obvious mash up of dessert and mains that I have the psychological barrier with, but I don’t feel the same about bacon, pancakes and syrup, but then maybe bacon transcends course definition altogether and just is. Anyway, enough rambling, here's my version of chicken and waffles, the starch instead of flour in the dredge keeps the chicken crisp and the masa adds a wonderful flavour. Pickle juice in the brine was a revelation, it really picks the chicken up.


Brine (baker's percentages)
100% Buttermilk
50% pickle brine*
4% salt
3% chilli powder
1% smoked paprika

* If you don't want to use pickle brine, just skip it, but keep the salt at 4%. We want the salt levels at about 3–5% by weight, and the above percentages are best guess to what the pickle brine is bringing to the party.


Dredge
250g potato starch
150g masa
1% salt (4g)


Fried Chicken
Chicken thighs are the best cut they are juicer and have more flavour. Use boneless thighs, if you feel confident and want to save a few bucks, buy bone-in a do the work yourself (the difference is usually $5/kg here in NZ).

The night before:
Mix the brine together and add the chicken thighs, refrigerate for at least few hours or overnight.

Ready to cook:
  • Mix the dredge together in a bowl, pass it through a sieve.
  • Remove the chicken from the fridge.
  • Get a fryer on, or a heavy base pot on the stove over a medium-high heat with a few inches of rice bran oil (or other frying oil), you want to get the oil to 190ºC before cooking.

Cooking:
  • Get a rack ready for the cooked chicken.
  • Pull a couple of thighs out of the brine and shake off any excess liquid.
  • Toss them in the dredge making sure they're coated all over.
  • Shake off any excess dredge and carefully place the chicken in the hot oil, make sure to lay it away from you so it won't splash back at you. My cast iron pot isn't huge so I only do 2 at a time.
  • Cook for 3–4 minutes, they should be cooked through and be golden brown, a good indicator is when the the bubbling starts to slow down.
  • Move the cooked chicken to the rack and leave to rest, they’ll stay nice and crispy thanks to the potato starch (DO NOT "drain" on paper towels, they are the enemy of all crispy fried foods).

Serving:
Well it’s really up to you, fill up a bowl of chicken goodness with lashings of hot sauce, share or don't. But I do suggest you try the combo of chicken and waffles at least once, below are the steps for my version, a whole wheat waffle and crispy fried chicken doused in zesty spicy syrup, topped off with some fresh pickled daikon to cut through the richness and a bottle of Tapatío hot sauce on the side to give a little extra chilli kick.


Pickled Daikon
Daikon
1 part mirin
1 part cider vinegar
salt

Mix together the mirin and vinegar, season with the salt, the daikon is a little bitter so a little extra salt won't hurt. Cut a 6 inch length of daikon off and peel, use a mandoline or speed peeler to cut thin ribbons, stacking them as you go. Cut lengthwise into fine strands. Toss the daikon in the vinegar mix, cover and let sit for about an hour. When ready to serve, remove the daikon from the liquid and squeeze out any excess liquid.


Zesty spicy maple syrup
100 ml Maple syrup
1 Lime, juice and zest
Chilli flakes
Salt

Add the lime juice and zest along with the syrup to a pot and place on a medium-low heat. Add chilli flakes to taste. Allow to simmer and infuse for a few minutes. Taste and add salt accordingly, a small pinch, grains, should do, just enough to take the super sweet edge off.


Waffle mix
150g Whole Wheat flour (~1 cup)
250ml buttermilk
1 tsp Baking soda
1 tbsp rice bran oil
1 egg
1.5 g salt

  • Combine the dry ingredients in a bowl and make a well. Whisk the wet ingredients together and pour into the bowl. Fold together, don’t over mix.
  • Lightly grease the waffle iron and cook as per your cooker. Transfer to a rack in a warm oven (~50ºC), if preparing well in advance transfer to a rack to cool, and then reheat in a warm oven later.

Friday, August 28, 2015

Waldorf Slaw with fried spicy chicken


I do believe I have thoroughly covered fried chicken on here previously, so excuse the gloss over, this isn’t too different from previous versions, apart from the fact that white meat is used.


Waldorf Slaw
Savoy Cabbage
1 Apple, granny smith or lemonade are good
Walnuts, toasted and chopped roughly
Red onion, thinly sliced
Mayonnaise
Lemon juice
  • Remove the tough outer leaves from the cabbage, peel off enough leaves for the salad and blanch in boiling salted water for a minute, transfer cooked leaves to an ice bath until cool, thoroughly drain and pat dry, slice thinly.
  • Slice the apple thinly into matchsticks and toss in a bowl with lemon juice. Add a dollop of mayonnaise. Toss through the cabbage, onions and walnuts, taste and season with salt and lemon juice.

Fried Chicken Strips
  • Place buttermilk, 1% salt, cayenne pepper, hot sauce into a zip-lock bag.
  • Cut chicken breast lengthways into 1cm slices, place in the bag and massage, put in the fridge and let it rest at least 4 hours.
  • Add to a bowl, by weight, 1 part wheat starch, 1 part tapioca starch, 1% salt, 2% garlic powder, 1% cayenne pepper, 1% baking soda. Mix well.
  • Tip the chicken out into a colander. Set up a rack over a sheet pan. Take strips of chicken, knocking off excess buttermilk and toss in the starch. Arrange the coated chicken on the rack. When done refrigerate for 30 minutes, remove before heating the oil.
  • Heat a few inches of oil in a heavy based pot, I usually use rice bran or canola, but any frying oil, or fat, is fine.
  • Set up a rack to transfer the fried chicken to, near the pot is good. I usually have a rack with raw chicken on the right, pot in the middle and rack for cooked chicken on the left.
  • When the oil is at 190ºC start carefully laying strips of chicken in the oil, don’t overcrowd the pot, you’ll need to do it in batches.
  • Cook for 2–3 minutes, remove to rack and drain.
  • Toss the cooked chicken in your favourite hot sauce and serve in a soft bun with Waldorf slaw and most importantly crinkle cut pickles.

Wednesday, July 29, 2015

Fried Chicken


There’s something comforting about a plate piled high with fried chicken, a side of slaw, potatoes and gravy, and a few pickles. It’s not the healthiest dinner in the world, but cooked correctly the chicken should be anything but greasy.

This is a pretty good base recipe, if you want to kick the heat up a notch or ten add cayenne to the brine, and up the percentage to three in the dredge, don’t go overboard in the dredge though as the higher percentage spice likely burn when fried.

I’ve used wheat starch as it’s gives a crispier coating that keep crunch for longer than plain flour, but there’s no reason you can’t use flour if you don’t have any at hand. Potato starch could be substituted also. Wheat and potato starch can readily be found at any asian market in Wellington.

Chicken portions
Oil for frying, canola or rice bran

Brine
Buttermilk
4% Salt
6% Hot Sauce

Dredge
Wheat starch
1% Salt
1% Cayenne

Mix together the brine ingredients and pour into a ziplock bag, place in the chicken portions and seal, removing as much air as possible. Place the bag in a bowl in the fridge overnight.

Half an hour before cooking remove the chicken from the bag, shake off any excess brine and arrange on a rack, allowing any excess brine to drip away.

In a heavy based pot, I use an enameled cast iron pot, pour in a couple inches of oil, enough to cover the chicken. Place the pot on a medium heat and monitor the temperature, you want it to get to 180-190°C and then maintain it at about 160°C when cooking.


Combine the dredge ingredients together in a bowl, mix thoroughly. Toss the chicken in the dredge, shake off any excess and place back on the rack.

Get a rack set up ready for the cooked chicken, if you’re doing a large batch you could put it in a warm oven, but if you’re only cooking up half a dozen pieces the bench will probably be fine.


Carefully lay a piece of chicken, away from you, into the hot oil, don’t overcrowd the pot. Cook for about 5-10 minutes for a drumstick, or until the internal temperature has hit about 65°C, it will rise while resting, if you’re a bit worried cook to 70°C. As the chicken cooks you’ll notice that the oil starts of vigorously bubbling and slowly subsides, this is the moisture in the chicken turning to steam and escaping, it’s also a good indicator that the chicken is getting near done when the bubbling starts to calm down.

Wednesday, March 4, 2015

Hot thighs


Well I had planned to actually deep fry the chicken, you know go the whole hog, brine, dredge, egg wash, fry and get greasy spicy chilli oil everywhere. However the day kind of got away from me and quite frankly I had lost all motivation to get a pot full of oil and control temperatures, and then clean up the mess, so I looked to my previous tried and trusted methods of oven “fried” wings, spiced it up and adapted it for some juicy thighs. There aren’t really any proper quantities below, they are all to taste, it’s more the method of getting pieces of chicken with a crunchy exterior and a steamy moist interior without having to resort to deep frying. The method is a little more time consuming than chucking a bunch of chicken in a hot oven and cooking, but not by much.

  • In a large bowl mix together flour, salt and cayenne pepper, as much or as little as you want, go a little heavy on the salt as it will be the only seasoning the chicken will get.
  • Toss the chicken pieces through the flour mix, make sure to pat the mix into all the crevices. Place on a sheet pan with a rack and refrigerate uncovered for an hour.
  • Get two bowls out, in one get an egg wash ready, 50/50 mix of egg and water, in the other mix together 1 part flour and 1 part semolina, spice with cayenne and chilli flakes.
  • Dip the chicken in the egg wash and then dredge in the flour mix, return to the rack. Refrigerate uncovered for at least an hour, you could do this the day before.
  • Preheat the oven to 220ºC, remove the chicken from the fridge 10–15 minutes before cooking, place the tray in the oven and cook for 10 minutes. The short cooking time is to “set” the coating in place before meddling. Reduce the heat to 200ºC.
  • Remove and brush the top of the chicken with chilli oil (store bought or canola blitzed with dry hot chilli flakes), return to the oven and cook for a further 20 minutes.
  • Remove from the oven, turn the chicken over and brush the exposed side, return to the oven for another 20 minutes.
  • Last time, remove the chicken, flip it, don’t bother brushing it, you shouldn’t need to, cook for a final 10 minutes.
  • Transfer the cooked chicken to a cooling rack to rest for a 10 minutes, lace with hot sauce and devour with a cooling slaw and pickles, always pickles.

Tuesday, February 10, 2015

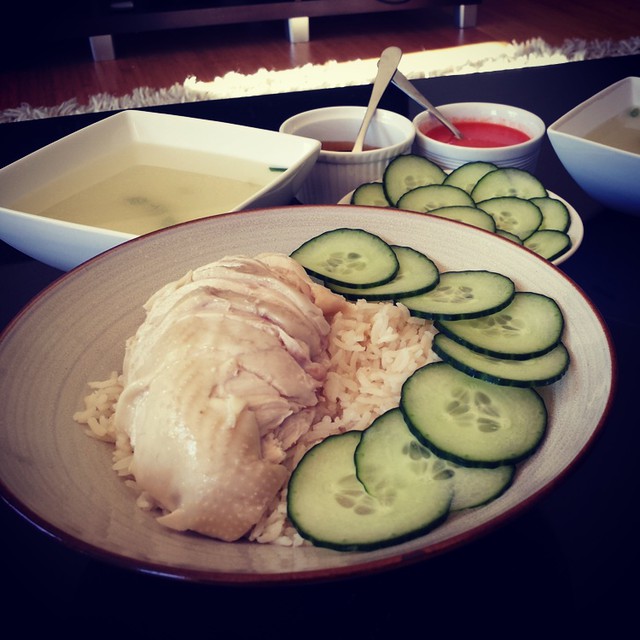
Hainanese chicken


I haven’t really been terribly experimental in the kitchen lately, rather visiting old favourites such as pulled noodles, spicy chicken, playing around with pastas, and tonnes of salads. Nothing that jumps out as I must post about this! Mind you that’s what instagram and twitter is for I guess, share the meal not the recipe. It’s not so much the food is dull, it’s more that I have either posted about it before or I don’t think you really need another recipe for braised brisket and tostadas, which by the way fish sauce; miso; and ground shiitake can turn a “Mexican” braise into a savoury bomb!

Anyway, here’s a recipe I cobbled together for Hainanese chicken, a deeply satisfying dish and not too heavy at all, best of all it’s a doddle to cook.


Chicken
1 Whole chicken
Spring onions
Ginger
Ice
  • Pull excess fat out of chicken cavity and set aside.
  • Rub the chicken skin with kosher salt until it becomes smooth and taut.
  • Rinse and pat dry.
  • Season thoroughly (heavily) inside and out.
  • Stuff tightly with spring onions and ginger.
  • Place in a pot and cover with water, about 2 cm above the bird.
  • Bring to a boil and then turn the heat down low.
  • Simmer for about 30 minutes, skimming scum as it forms. It’s done when the internal temp is 76ºC.
  • Carefully remove from the pot and submerge in an ice bath.
  • Retain the cooking liquid, this is the soup and rice cooking liquid.

Rice
2 Cups jasmine rice
3 Garlic cloves, finely chopped
1 Thumb of ginger, finely chopped
Reserved chicken fat
½ Tsp sesame oil
2 Cups of reserved cooking liquid
  • Rinse the rice until the water runs clear, soak for 10 minutes.
  • Sauté the ginger and garlic in the chicken fat, be careful not to burn or over brown.
  • Drain the rice and add to the pot, sauté and then add the sesame oil.
  • Add the cooking liquid and bring to the boil.
  • Reduce heat to low and cover.
  • Cook for 15 minutes, don’t peek, just leave it be.
  • Remove from the heat and let it rest for 5–10 minutes, again leave the lid alone.

Broth
Heat the remaining cooking liquid and season with salt as needed, garnish with sliced spring onions.


Chilli sauce
Look you could probably just cheat and use good ol’ Sriracha, I wouldn’t think any less of you, in fact I use a fermented chilli sauce as my base.

4 tbsp Fermented chilli sauce, use your favourite
1 lime, juiced
2 tsp sugar
2 tbsp cooking liquid, more or less
4 cloves garlic, crushed to paste
1 thumb of ginger, crushed to paste

Mix all of the ingredients together, apart from the liquid, use the cooking liquid to loosen it to a desired consistency. Taste and season, a little fish sauce is nice instead of salt.

For the Table
Dark soy sauce
Chilli sauce
Sliced cucumber

Serve
It’s really up to you how you want to serve up, I like a bowl of the rice with some of the chicken carved on it and garnished with cucumber. Rub the chicken with a bit of sesame oil before carving to make it a bit more aromatic.

Thursday, December 4, 2014

Extra hot chicken


For a long time I had avoided deep fried foods, much for the same unguided reason I avoided the fat in food, I was brainwashed to believe fat in means fat on, not the reality that it’s just a source of calories no different from the other calories going in, maybe a bit more dense in calories and possibly not as nutritional. I also had the impression that fried food equal greasy fatty food, this maybe true for things such as french fries which can be a whopping 50% fat by weight and food cooked incorrectly, but not at all the case for foods cooked at the correct temperature. The other main reason for the avoidance, or at least at home, has always been the smell, but get a thermometer, a heavy based pan, don’t overcrowd it, and that shouldn’t be a problem either, heck even the crappy domestic extraction system should be enough to deal with it.

So, deep fried chicken, getting thoughts of poorly cooked greasy fast food? Well, don’t, think crisp, crunchy, steaming hot, not at all greasy, fiery hot spicy goodness that will leave you red in the face and dripping with sweat.

3 Chicken legs, portioned to thigh and drum
Canola oil


Brine
All percentages are by weight (eg. 1000 ml water, 50 grams salt)
Water
5% Salt
2.5% Cayenne powder
1.5% Garlic powder
1.5% Onion powder
2.5% Chilli flakes
0.5% Hot sauce
0.5% Morita Chilli

Heat the water in a pan and dissolve the salt, add all the other ingredients and cover, let it cool to room temperature. Place a large zip lock bag in a bowl and add the chicken, pour in the brine and remove as much air as possible while sealing the bag. Place in the fridge for 12–24 hours.


Dredge
Flour
Salt
Cayenne Pepper*
Chilli Flakes*
*The more you add the hotter it’ll be, so add heaps!

Remove the chicken from the brine and pat dry, toss in the dredge, shake off excess flour and place on a tray with a rack on it. Refrigerate for an hour, uncovered. Do not dispose of the remaining dredge yet.

Egg Wash
1 part Egg
2 parts Water
Salt


Cooking
  • Remove the chicken from the fridge and let sit at room temperature for about 30 minutes.
  • Heat several inches of oil in a heavy based cast iron pot to 190ºC.
  • Dip the chicken pieces in the egg wash, shake off any excess, toss in the dredge again, and shake off any excess flour.
  • Cook the chicken in batches, carefully laying the chicken away from you in the oil, cook until the internal temp reaches 65-70ºC (depending on how paranoid you are, the temp will rise at least 5ºC while resting).
  • Remove the pieces to a rack, not paper towels, to drain and rest while you cook the remaining chicken.

Serve with some sour pickles and lashings of hot sauce (if you can take the heat).

Bonus, oven baked extra hot wings


Brine
Water
5% salt
Chilli flakes*
Cayenne pepper*
*As much as you can handle, more the better I say.

As above, place wings in cooled brine in zip lock bag and refrigerate for 12–24 hours.

Dredge
2 parts flour
1 part fine semolina
smoked paprika
cayenne

  • Mix all the ingredients together in a bowl. 
  • Shake excess brine off the chicken and place in the bowl. 
  • Cover tightly with a couple layers of cling film and shake (you could do this in a bag), make sure the chicken is evenly coated. 
  • Place chicken on a rack set over a sheet pan and refrigerate uncovered for at least an hour. 
  • Use a spritzer to coat the chicken in a fine film of olive oil, or gentle toss the chicken in a bowl with a little oil (take care not to dislodge too much coating). 
  • Use a sieve with some fine semolina to put a light coating on both sides of the chicken. 
  • Cook in a preheated 230ºC oven for 40–60 minutes, turning every 20 minutes. 
  • Add lashings of habanero hot sauce and devour.

Monday, November 3, 2014

Cavatelli with poached chicken


As one does, I spend a bit of down time trawling through ebay seeing what bargains can be had, and quite often have to forcefully tell myself that no I do not need vintage Mello Yello crown caps, even if my home brew bottles would look awesome, but every now and then I just can't help myself, especially when it’s a gnocchi board for less that $5 and free shipping, it’s a must purchase if you want to hand roll cavatelli, which ever since the machines purchase I have wanted to have a go on a proper wooden gnocchi board. Well, order placed, I had hopes that it’d turn up before I left on holiday, in fact I had a few packages I hoped wouldn’t be sitting on the doorstep for a week while I was away, maybe I have an online shopping problem.


Cavatelli
180g flour
180g fine semolina
168g warm water
10g salt

  • Dissolve salt in water.
  • Mix flour and semolina together.
  • Form a well and pour in water.
  • Mix together and knead for 10 minutes.
  • Cover tightly with cling film and rest at room temp for 30min.
  • Cut off about quarter of the dough, cover the remainder.
  • Using your hands roll out into a thin log, about a pencil width thick.
  • Cut into 1cm segments.
  • Place a piece on the top edge of a gnocchi board
  • Push down with your index finger across the board and drag with pressure towards the bottom, it should curl over itself. (Kind of like stroking the length of the board with the flat of your index finger with some pressure)

Chicken poached in stock with peas, thyme, pulled apart.

Peas from the poaching liquid passed through a mouli to purée and remove the skins, then with an immersion blender, olive oil and cider vinegar are emulsified into the purée. Seasoned with a little Dijon mustard, salt and pepper. Transferred to a little piping cone made from parchment paper.

The poaching liquid is topped up with enough water to boil the cavatelli, cook for 5 minutes.

Asparagus sliced in half, sautéed in pan then finished with pasta stock to poach. Fresh garden peas tossed in at the last second to warm through.

The pasta is tossed with some of the cooking liquid, chicken, fresh peas, asparagus and olive oil, seasoned, arranged on a plate, the pea “mayo” piped on, and finished with a little grated parmesan.

Sunday, October 19, 2014

Orecchiette


I’ve been quite excited about getting the Flour+Water cookbook, I even pre-ordered it, something I don’t do that often, the book is beautifully put together, full of stunning photographs, and very well written with easy to follow recipes. Their instagram feed is a must follow. The Orecchiette below is from the book (not verbatim) and the sauce my own, more of a I really really want to make Orecchiette, get another pasta method under my belt, and I have leftover roast chicken thighs that were going to become a rye berry salad but transitioned quite easily to a nice stocky sauce.

Sauce
Leftover chicken meat shredded, thighs and drum
1/2 carrot very finely diced
1/2 red onion finely diced
2 cloves garlic, minced
2 tbsp parsley and oregano, finely diced
1 cup chicken stock, infused with thyme and chilli
1 tsp cider vinegar
Chard, leaves finely sliced and stalks finely diced
1 tbsp butter
75~100 ml pasta water
Parmesan cheese
Salt and pepper
Olive oil

Sauté chicken until crisp and golden around the edges, toss in the carrot, onion and chard stalks, cook until translucent, add the garlic and deglaze with cider vinegar. Add the chard leaves and chicken stock, simmer until reduced by half. Put the pasta onto cook, and after about a minute add a ladleful of the pasta cooking water and swirl in the butter, don't stir. Taste and season.1 minute later (2 minutes total) add the 80% cooked pasta and toss, finish cooking it in the sauce. Stir in the herbs, cook for 30 seconds more. Double check seasoning. Serve up with shavings of parmesan.


Orecchiette
180g flour
180g fine semolina
168g warm water
10g salt


  • Dissolve salt in water.
  • Mix flour and semolina together.
  • Form a well and pour in water.
  • Mix together and knead for 10 minutes.
  • Cover tightly with cling film and rest at room temp for 30min.
  • Cut off about quarter of the dough, cover the remainder.
  • Using your hands roll out into a thin log, about a pencil width thick.
  • Cut into 1cm segments.
  • Use a butter knife and push down on the far edge of a piece and pull towards yourself, so the dough curls over.
  • Uncurl over your thumb and turn inside out to form a dome.
  • Place completed Orecchiette on a sheet pan dusted with semolina.
  • Leave to air dry at room temp until you’re ready to cook.
  • Boil in well salted water for about 2 minutes, and then another minute in the above sauce.

Sunday, August 31, 2014

chicken thigh roulade


Well as I usually do when I buy a chicken without the express purpose of roasting it, and sometimes even then, I break it down. If I'm roasting it I'll leave the breasts on the bone but disassemble the other parts, after all there are usually only 2 mouths to feed. Otherwise the breasts come off and separated for 2 meals, the wings off for stock or a quick snack, the thighs usually kept on with the drum and are a portion each, and then finally the carcass is set aside, usually in the freezer ready for stock. I usually view the whole procedure as practice, for what I'm not quite sure, but I have the process down, these days I can break-down, debone and skin a chicken quicker than you can say it.

As with most things repetition makes you look for a break in the usual, so with this latest chicken I broke it down pretty much as normal but took the skin off whole and deboned the thighs, I wanted to do a roulade, I knew I was going to stuff it with ricotta and hazelnuts, heck I knew that when I bought the ricotta well before I bought the chicken, I knew pretty much how I was going to cook it, sous vide for an hour at 65°C (fry it to crisp the skin after), but looking at what I had to work with I wasn't quite sure how it was going to happen. That was until I remembered a certain little package that was sitting hidden in the bottom of the freezer, probably past its usable date, a packet of transglutaminase, activa rm, or commonly named meat glue, I had been thinking of a reason to use it for quite some time but most everything seemed convoluted, not tonight though, I needed something to hold these disparate pieces together.

A trusty small sieve was loaded with the white powder, skin laid down on a sheet of cling film, a dusting of the powder, thigh meat arranged in an even layer—leaving an edge with some skin uncovered—another coating of the powder, the filling shaped down the middle, the edge bought up and rolled tightly with the cling film, using a skewer, holes poked to release air bubbles, another layer of cling film down and used to roll it tighter, holes poked again, another layer rolled tighter, the ends rolled in opposite directions (like a Candy wrapper) tied with string and left to set in the fridge overnight.

The inside of the roulade was seasoned with smoked salt and pepper and the stuffing was made by equal volumes (by eye) of hazelnuts blitzed in the blender and ricotta (with salt and parsley).


Well most of the hard work done, the next day a large pot of water is heated to slightly higher than 65°C and the wrapped chicken removed from the fridge. A few more holes are pierced through the cling film to get rid of any pesky air pockets and the chicken is wrapped tightly again and tied to form a watertight seal. The wrapped chicken is placed in the water bath for about an hour or until the internal temperature reaches 65°C, remove the chicken from the water and carefully unwrap, use a clean tea towel to carefully dry the outside of the roulade, I find rolling it up in the towel to rest while I prep the rest worked best.


Heat about a centimeter of olive oil in a heavy based pan and get it to frying temperature, carefully brown the roulade all over, it will spit like crazy so be careful not to burn yourself. When fully browned place on some paper towels and cover, leave to rest while you sauté some cavolo nero.

Slice the roulade and serve on a bed of the sautéed greens.

Wednesday, August 6, 2014

Sprouts, mayonnaise & chicken


Get sprouting! Well I have been anyway, I’ve been getting into salads, especially heavy on the celery, greens and all, using ingredients I haven’t really thought of using before, like whero peas, wheatberries and quinoa, but most of all I’ve really been digging the humble sprout. The thing about the sprout is you have to have a little forethought or a production line set up as quite frankly they are ridiculously overpriced to buy pre-sprouted. On a positive note, sprouting is easy as pie.

Place quarter of a cup of mung, puy lentils or whero peas in a clean glass jar, rinse and drain a couple of times and then fill up with water, cover with a tea towel and leave overnight. The next morning, drain off the liquid, give the jar a jostle so the seeds aren’t languishing in a pool of water. Repeat the rinse and drain for 3-5 days until the sprouts have got enough sprout for you, 2 days is usually enough for a nice short sprout, but I wouldn’t leave it longer than 5. They’ll keep covered in the vegetable crisper for a couple of days.

I was going to assume that you know how to make mayonnaise before I got into the coleslaw, but I figure I should give it a quick once over. This method is for a stick blender. Use a jar that is just big enough to fit your blender, it’s preferable that the opening is smaller in width than the body of the jar. Add one egg yolk to the jar along with a dash of cider vinegar and a teaspoon of Dijon mustard. Start running the blender and slowly drip in some neutral oil, I use a mix of olive and canola(rapeseed), when the emulsion has formed you can start pouring in the oil more liberally, for a lighter mayonnaise you can alternate between oil and water, you should be able to get about 50% water content. Taste and season with salt and vinegar. If the mayonnaise doesn’t thicken try adding more oil or another yolk, if the emulsion breaks or doesn't form, pour the mix into a jug and in the jar add an extra egg yolk and slowly blitz in the broken mayonnaise. It should keep in the fridge for a couple of months.


Anyway back on track to the slaw, take a couple of tablespoons of mayonnaise and mix in a crushed clove of garlic, let it sit in the fridge a while so the garlic can mellow a bit. Thinly slice a fennel bulb and red onion, on a heavy bias slice some celery and its leaves, slice the larger green leaves thinly and just roughly tear the smaller yellow ones. Toss it all together in a bowl with some sprouts, crushed pumpkin seeds, smoked salt and the garlic laced mayonnaise.


An ideal match to the crisp cool slaw is a hot and spicy chicken wing, or in this case drumstick, I've covered hot wings so many times on here it's not funny but this time it's my oven "fried" chicken drumsticks. You end up with a crusty crisp coating and fall apart moist flesh below. In a large bowl add a good few tablespoons of tapioca starch, you can get this from a good Asian supermarket or here in New Zealand pick up arrowroot from the baking section of the supermarket, it's not arrowroot but just tapioca starch, mix in a sprinkling of salt, smoked paprika, hot chilli powder/flakes, spice it up as hot or mild as you like, and coriander powder. Toss the drumsticks in the mix to coat and place on a plate, cover and refrigerate overnight. When you're ready to cook, preheat the oven to 220°C, prepare another mix of tapioca starch and spices, toss the drumsticks in the powder to coat, arrange on a baking tray and cook for 30–45 minutes turning twice. If you really want to go for extra lush drumsticks melt some butter with hot sauce and crushed garlic and when the chicken is fresh out of the oven toss in the butter sauce, you won't regret it but your hips might.

Monday, April 21, 2014

Chicken wings the egg white version


I do seem to have lot of chicken wing recipes on here, this has to be version six I’ve published on here, and I wouldn't even want to start with the numerous experiments that haven’t made it to the site, I don’t have enough digits. This is a baked version a bit like the hot wings version I did a while back they’ll spend a little while in the fridge so preparing the night before is probably the best, but at a pinch six hours before cooking should be enough.

500g chicken wings
1 large egg whites
2 tsp baking soda
Chilli flakes
Salt

Prepare a baking tray that will fit in your fridge with a rack and set aside.

Whisk the egg whites until they have increased in volume but still runny, we’re not looking for soft peaks just a little volume so coating the wings is easier.

Add the baking soda, chilli flakes (to taste) and salt (about a teaspoon). Whisk together.

Toss the wings through the egg white mixture and transfer to the baking tray, make sure there is space between the wings. Transfer to the fridge uncovered and leave overnight, or prepare in the morning for the evening.

Pre-heat the oven to 230ºC, cook the wings for 15 minutes, turn the wings over and cook for 15 minutes more, turn over again and another 10–15 minutes depending on their size and how well you like you chicken cooked.


Toss the hot cooked wings in your favourite hot sauce, I’m quite a fan of Tapatío hot sauce at the moment, and eat immediately or at least once they’re cool enough for you to handle. A finger bowl and paper towels are a must.

Wednesday, March 26, 2014

The best chicken gravy


This is a really simple sauce that takes no time at all to prepare and really brightens up a roast chicken meal, instead of that heavy gluggy gravy this is a bright sweet and sour sauce with the chicken drippings adding that unctuous roast gravy feel.


In a pot over a medium heat add a couple of tablespoons of sugar and a dash of water, slowly melt the sugar until it caramelises. How far you want to take it is up to you, I like quite a dark caramel.

Deglaze the pan with about the same amount of vinegar and let the sugar dissolve. Use something that will compliment the liquid you’ll add later, I used wine vinegar as I will add red wine, but if you were doing this for pork and wanted to use apple juice or cider, use a cider vinegar.

Add a generous glass of red wine and let the liquid reduce. If you want to add a herby note, now is the time to do it, with chicken I quite like to pop in thyme tied up in a bundle so it can be later removed easily.

Finally, once the roast has rested add the cooking/resting juices to the pan and reduce down again, season to taste and spoon over the served up roast.

Friday, February 28, 2014

Pea risotto


We’ve been quite lucky with the peas in our garden, they went in a little late and have given us a glut of plump pods, which we still have a good meal or two left on the plant, well that is if they survive my greedy little hands snapping them off and ripping open the snappy pod and scoffing the sweet round peas. Ever since the plant showed signs that it was actually going to produce I’ve been hanging out to make a risotto using our home grown peas, frozen is fine but nothing really beats peas freshly picked and podded mere minutes before being folded in some lush steaming risotto.

So to justice to the fresh produce, make your own stock or at least get some good quality stuff. It’s not too hard to get a stock going, and if you have a pressure cooker well you have no excuse at all not to make your own fresh chicken stock. Take one chicken carcass and any other saved chicken bits and bobs and place in the cooker, add a bunch of herbs, thyme, parsley, bay leaves, sage, then a carrot or two, roughly chopped, an onion or two depending on the size, a good dash of salt and pepper, pour in two litres of water and cook on high pressure for about 40 minutes. Strain the stock through a cloth into a saucepan and put on a medium-low heat and bring to a simmer, reduce down to about one litre, skim off any scum as it reduces. Strain into a bowl through a cloth, cover and let cool, when cold enough transfer to the fridge. It should set up to a nice firm jelly overnight.


I had about twenty pea pods, which would be about half a cup of actual peas, so the peas are podded the peas set aside and the pods put into a pot with the chicken stock and a fresh bunch of thyme and parsley, bought gently to a simmer and left for about fifteen minutes, refreshing and infusing the stock, it is then strained and put back in the pot and put on the lowest flame. Adjust the seasoning of the stock with lemon or vinegar but not too much salt at this stage.


Getting the risotto together is very simple and quite therapeutic standing in front of the stove stirring and folding the rice, adding the stock little by little until it’s reached just the right consistency, not hard at all, just remember slower is better.

With a large pan on a medium heat add a good glug of olive oil and toss in a finely diced shallot, sauté until translucent and then add a cup of risotto rice cook until almost fully translucent, stirring constantly, deglaze the pan with a cup of dry white wine. When the wine has fully evaporated add in a small ladleful of stock (about 70ml) and stir in, keep stirring and folding the rice, helping release the starch, a silicon spatula makes easy work of this, when the stock is all but absorbed add in another ladleful of stock and repeat, the rice should take the whole litre and will take a little more than twenty minutes to cook on a low heat.


Once the rice is lush and cooked, taste and adjust the seasoning, fold through the peas, they’ll take no time at all to cook. I gilded the lily a little and stirred through a large tablespoon of ricotta, mainly because I had it and it needed to be used. Fold in a chiffonade of mint and spoon into a serving bowl and drizzle with a little peppery olive oil.

Saturday, February 1, 2014

Pâté de Campagne


I bought myself a wee early Christmas present, a Le Creuset Terrine, I’ve always wanted one but the price tag has put me off until now, however I had plans for my contributions toward the Christmas fare and it seemed as good of an excuse as any to indulge myself. I’ve previously mentioned the Walnut bread and Chicken Liver Pâté, but they were mere sides to my ambitious plans, well maybe not that ambitious, of Pâté de Campagne is pretty simple to put together, although the mincer from hell almost broke my wrist but apart from that it’s just few simple steps and patience.

You’ll have to excuse the lack of gram measurements, as these will depend on how large your terrine is. Also if you can get pork liver, great, if not use chicken, the same can be said of caul fat which I couldn’t get my hands on so I used very fatty belly bacon.


Meat
2 parts pork shoulder
1 part pork back fat
1 part liver

Trim the livers and cut in half, cut the back fat and should in to cubes small enough to fit through your mincer feeder. Chuck the whole lot in a bowl that will fit in your fridge.


Marinade
Brandy
White wine
Sage
Thyme
Parsley
Shallots
Nutmeg
Pink Salt (optional, use 1% by weight of the meat)

Roughly chop the herbs and shallots and toss into the bowl with the meat, grate in nutmeg to taste. Pour in a glass of wine and a splash of brandy. Add the pink salt if you’re using. Stir through and cover. Refrigerate overnight.


Other
Streaky bacon/caul fat
1 egg
Salt (around 2% by weight, this can be adjusted later)

Set your mincer up with a medium die and pass through the meat mixture. Using your fingers mix through the salt and egg. Take a small portion and wrap in cling film, making it water tight, and poach in some simmering water until cooked, taste and adjust the seasoning as needed, remember that the terrine is served cool so the seasoning will be more muted.


Line the terrine with the bacon (or fat) and pour in the minced mixture. Tap the terrine on the bench to get rid of any air pockets. Fold the bacon over the top of the mixture and place on the lid. Place the terrine in a bain-marie (with hot water) and into an oven set at 150–160°C, cook for about 2.5 hours, or until the internal temperature is about 70°C (65°C should be enough though).


Remove from the bain-marie and let cool, then weigh down a tight fitting lid with a couple of cans, use a stiff piece of cardboard cut to the correct shape and wrap in tin foil, refrigerate overnight.

Serve with pickled onions, cornichons, hot mustard and my walnut flat bread.

Wednesday, January 1, 2014

Chicken liver pâté


Well it’s the season again, drink, eat and be merry, fortunately I had a little self control this year and managed to not overindulge, well in the food department anyway. It was hard though, christmas day greeted us with two hams, a turkey, a side of beef, mutton and a glut of tasty sides. I'm usually not one to shy away from a tasty piece of ham and had to restrain myself not to eat the lot. I suppose the only good fortune is that I don’t have a sweet tooth as we were bombarded with a barrage of desserts, but I only had eyes for the ham.

I did contribute a little fare to the table, pâté de campagne, chicken liver pâté and a walnut flat bread. The former really an excuse, a good one, to use my christmas present to myself a new terrine, however I’ll get to that later, today is all about pâté.

Chicken liver pâté
500 g butter
1 kg chicken livers (trimmed and cut in half)
250 ml cream
125 ml brandy
5 shallots, diced
A bunch of thyme
Salt and pepper

Take two thirds of the butter (by eye is fine) slice into cubes and place in the fridge. Divide the remaining butter into four, this will be used to cook the livers in three batches and the final lot to soften the shallots.

Melt a portion of butter in a medium-hot frying pan and when the foam subsides add in a third of the livers, cook about two minutes per side, they should be pink in the middle with no signs of blood. Transfer to a bowl. Repeat with the remaining the remaining two thirds of butter and liver.

When the livers are cooked and resting in a bowl add the last lot of butter to the pan and add the shallots, cook until translucent, add the thyme and cook until fragrant. I usually don’t bother stripping the leaves off the branch, rather I just tie them together so I can easily remove once they have given up their flavour. Pull out the thyme bundle, if using, and add the brandy and flambé, when the flames subside add the cream and reduce by about half. Pour on top of the cooked livers.

Transfer the lot to a food processor and blitz, while the machine is running add the cubed butter piece by piece until it is all incorporated. Transfer the purée to a sieve set over a bowl and work it through using the back of a spoon, and to torture your hands further, take the sieved mixture and place in a very fine mouli and work through. It may seem like a little overkill passing it through a sieve and mouli but it’s worth it for the texture.

Taste and season the pâté, take into account that when the pâté cools the seasoning will dull, so it’s best to over season slightly. Transfer to a dish and crack over a little black pepper and cover with some clarified butter. Cover and chill in the fridge.

Friday, October 25, 2013

Savoury oats with braised fennel and chicken


Oats aren't just for breakfast. A savoury concoction can be made by easily substituting milk or water for chicken stock and maybe simmering with a little shallot and garlic. It takes a little to get your head around the fact that the silky lush and oh so meaty tasting concoction are oats, or perhaps it’s just me the has them relegated to the humble position of if cooked in liquid it’s porridge and should be sweet. Other grains such as rice don’t seem to have the problem, rice as a carb on a plate for dinner, or congee a savoury porridge, or as rice pudding a sticky sweet mess, so why not oats?

Savoury Oats
One cup of oats with a diced shallot and two cups of chicken stock are added to a pot over a low heat, stir occasionally to begin with and bring to a gentle simmer. Cook for about 20 minutes, stirring more frequently as the oats thicken. They’re cooked when thick creamy and soft but still with a bit of bite, not sludge. Stir through fennel fronds and a splash of good olive oil. Season with salt.


Fennel Braise
Cut whole fennel into wedges, finely slice an onion, dice a spicy chorizo and toss together in an oven dish, sprinkle over salt and add a generous splash of sweet vermouth, about quarter of cup, cover tightly with foil and bake at 150°C for about two–two and one half hours. The fennel should be meltingly tender but still holding its shape, not a mushy mess.

Chicken
Season and brown chicken thighs all over and add to the braising fennel dish for the last 30–40 minutes.


Sauce
Drain the braising liquid into a saucepan and bring to a very low simmer. Make a paste of one teaspoon arrowroot and two teaspoons of water. Remove the pot from the heat and whisk in the paste. If it doesn't thicken straight away put it back on the heat and stir constantly, it will thicken quickly.