Monday, November 28, 2011

Peanut butter biscuits


I don't have much of a sweet tooth, give me cheese and crackers (or maybe oatcakes) any day over a piece of cake. But I had a hankering for cookies. Unfortunately our pantry is rather lacking when it comes to the sweet side of baking, but I did happen to have a bit of peanut butter left in the pantry so all was not lost.


I made a pretty basic cookie dough 1 part sugar, 2 parts fat and 3 parts flour.

50 grams white sugar
50 grams muscovado sugar
150 grams butter
50 grams peanut butter (more if you want a stronger peanut flavour)
1 egg
1/2 teaspoon vanilla
1/2 teaspoon baking powder

Pre-heat the oven to 180°C, don't use fan bake.


Cream the butter, sugars and peanut butter until pale and all the sugar is dissolved.


Mix in the egg and vanilla.


Sieve in the flour and baking powder (I used salted butter, if you're using unsalted add 1/8 teaspoon of salt here).


Roll the dough in to balls (I got 22 in total) and flatten with the palm of your hand, or roll out and use a cookie cutter.


Sprinkle with a mix of sugar and cocoa. Bake for about 12 minutes.

Transfer the cookies to a cooling rack.

Now you can let them cool on the bench if you like a slightly chewy cookie, but I like mine crisp, so I put the cooling rack back in the oven (turned off) with the door ajar to dry out.

Thursday, November 24, 2011

I ❥ Chicken


I love roast chicken, I don't mean sticking a whole bird in the oven and ending up with dry over cooked meat. I prefer to break down the bird before cooking, it gives more surface area to flavour, better cooked meat and a better carcass for stock.


A bowl full of olive oil, salt, pepper, olives (black olives (pelion), and Sicilian green olives), orange peel & juice, thyme, parsley and sage.


Toss the chicken pieces in the bowl.


Roast for about 30 minutes at 180°C.

Wednesday, November 23, 2011

Confit Garlic


I came across the recipe for confit garlic on the Modernist Cuisine blog the other day and I had to make it. It seemed like a great thing to have sitting ready in the fridge, and the idea of caramelised garlic goodness mashed on crusty toasted bread was too irresistible to pass up.

So on the way home I picked up an extra bottle of olive oil (the alternate suggestion of duck fat sounds pretty good too) and half a kilo of garlic.


Fill a Mason jar three quarters of the way up with garlic cloves, a sprig of rosemary and some thyme. Fill almost to the top with olive oil and screw on the lid, do a quarter turn to loosen it so steam can escape from the jar.

Place the jar on a trivet in a pressure cooker and pour enough water in to come 2 cm up the side of the jar. Cook for 2 hours on high pressure.


The cloves turn an amazing deep caramel brown and smell of deep slow roast garlic. I have a feeling this will be a staple in my fridge (they should last 2 months in the fridge).

Check out the Modernist Cuisine blog post for a heap of tips and information and more detailed recipe.


Modernist Cuisine - Pressure Cooker Safety : Garlic Confit from Modernist Cuisine on Vimeo.


I made up another batch of Garlic Confit and got a video of the jars just as I pulled them from the pressure cooker, the jars are sealed and still under pressure, the boiling stopped as soon as the lids were removed.

Monday, November 21, 2011

Homemade Bacon - The Final


It was finally time to smoke the pork that has been hanging under the stairs, and only hours away from munching down on my very own home made bacon.

Read Part 1.5

Read Part 1

Smoking the bacon is really easy, get the smoker smoking and up to temperature. The smoking temperature should ideally be between 75°C-85°C. Any hotter than 85°C the meat will shrink, loose too much moisture and will be cooking.

When the smoker is ready put in the pork and leave it for about 90 minutes, the internal temperature of the pork when it's done should be 65°C.


Straight from the smoker, looking delicious.


While it's still warm, remove the skin. The skin can be used to make stocks and is excellent to cook beans with.


A few "test" slices taken off the freshly smoked bacon.


Fried quickly in a smoking hot pan.


Had to use so much willpower not to devour the entire lot.

I found making bacon surprisingly easy, and has definitely put me off store bought bacon. So I'll soon be starting the process again so I have a ready supply of bacon. And I am giving serious though to making my own ham, pastrami, pancetta etc.


All sliced up, portioned and vacuum sealed, it should last about 3 weeks in the fridge or 4 months in the freezer.


I also put a tray of kosher salt in the smoker at the same time as the pork.

Saturday, November 19, 2011

Homemade Bacon - Part 1.9


Final post of the bacon coming soon, I've just finished smoking it and at the moment it's sitting in the fridge to firm up before I slice it. Here's a snapshot of how the pork belly has transformed over the two weeks it took before it got to the smoker.

Read Part 1.5

Read Part 1

Barley


I don't know why I haven't used barley as main part of a dish before, I've used it in stews, soups and cordials, but never as a main component. The only reason I can think of is that it takes a long time to cook and is suited for slow cooked stews and soups.

But with the pressure cooker I no longer had the excuse of time, so I cooked the barley until it was almost cooked through, drained and set aside.


Finely dice up some carrot, onion and celery. Soften in a hot pan with a dash of olive oil. When the vegetables are translucent and beginning to caramelise around the edge, deglaze the pan with a little red wine vinegar, pour in the cooked barley and add a cup of good beef stock.


Simmer until the barley has finished cooking, season with salt and pepper and add a good handful of chopped parsley.


The young leafs of celery are very tasty but get bitter the older, bigger and greener they get.

Wednesday, November 16, 2011

Lamb pizza


A Middle-Eastern inspired pizza for dinner tonight. It starts off just like every other pizza, with a basic dough. Although, instead of a variety of toppings finished off with melting cheese, this has a rich spiced lamb mince drizzled with olive oil, yoghurt and lemon juice.

Place a heavy tray near the bottom of the oven and preheat to 230°C.

Finely dice some celery, carrot and onion. Soften the vegetables in a pan with a little olive oil. When the onion is translucent sprinkle in a teaspoon (or so) of coriander, cumin, thyme and smoked paprika, add dried chilli flakes (as much or as little as you like). Cook until aromatic. Add about 500 grams of minced lamb, cook until brown. Finally add a jar (500 ml) of passata (or whiz up a can of tomatoes), cook until almost dry. Season with salt and pepper to taste.

Set the meat aside to cool down.

Take a ball of dough and evenly roll out in to a thin round. Place the rolled out dough on a lined tray. Spread out a layer of cooled lamb mixture on the rolled out dough. Slide the pizza on to the hot tray in the oven.

Cook for about 6 minutes, it should be puffed up and brown around the edges, if unsure lift an edge to check if it's cooked underneath.

Remove the cooked pizza from the oven and sprinkle with some chopped parsley, a swirl of yoghurt, a drizzle of olive oil and a squeeze of lemon juice.

I find the best way to eat this is fold it in half, pick it up and munch away, it's even better if you stuff a bit of herb salad in the middle.

Tuesday, November 15, 2011

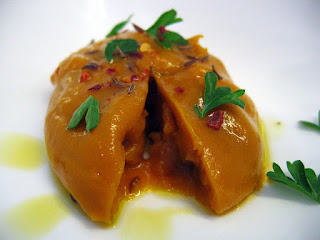
Carrot Burrata


I've had a few things from Modernist Pantry sitting the back of the pantry for a while and haven't had much of a chance to experiment with them, until now. I came across a post on Ideas In Food, they had a fun take on Burrata, instead of mozzarella with a soft curd and cream centre, they made it from banana. I had to try it, well the method at least.


I was having another go at caramelised carrot soup, and the idea floated from the recesses of my mind to try the Burrata method with it. Now I'm no expert when it comes to using things such as agar agar and locust bean gum, so the measurements on here are derived from the percentages on Ideas in Food (which I figured out by weight at salt 0.3%, locust bean gum 0.04% and agar 0.35%).

Make the soup (recipe) but use the weights below, stop after you have puréed it and passed it through a sieve and don't add the peanut butter.

Soup ingredients:
500 grams Carrot
25 grams Olive Oil
200 grams Stock

Buratta ingredients:
2.4 grams Salt
0.27 grams Locust Bean Gum
2.7 grams Agar Agar


Weigh out the dry ingredients. Accurate digital scales are essential.


Pour the soup into a blender, turn it on, when a vortex has formed, sprinkle in the powders and let it run for 15 seconds so they disperse.


Pour out the soup in to a dish and let it cool on the bench. Once it has formed a solid gel, place one third of it in the fridge.


Blend one third of it to make a fluid gel, and chop last third to resemble curds. Combine in a bowl and season with some caraway seeds, mix together.

Take a square of plastic wrap and place 2 tablespoons of the mix in the centre, bring up the corners and twist (to create a ball) and secure with a length of kitchen string. Place the balls on a tray and put in the freezer for 3-4 hours.


Unwrap the frozen balls and place back in the freezer while the gel from the fridge melts over a low heat. Use a metal skewer or toothpick as I did to dip each of the balls in the melted gel (do two coats). Place the dipped balls on a tray in the fridge to defrost.


Dressed with a little extra olive oil, parsley, caraway and chilli.


Sunday, November 13, 2011

Homemade Bacon - Part 1.5


A small update on the progress of my home made bacon. It has been curing for 7 days in the fridge, so pulled out and thoroughly rinsed, and patted dry with paper towels. The meat has firmed up and darkened in colour.


A small hole is made in the corner so some kitchen string can be looped through to hang it. It will hang for about a week (I've hung it up under the stairs as the temperature seems to be pretty stable at about 10°C).

So next weekend the smoker will be lit and bacon will be made, but it seems such a waste to just do bacon, so I plan on getting a ham on to brine in the middle of the week to add to the smoker, along with a bunch of garlic, and a tray of salt.

Note: You should check the hanging meat daily, and if any spots of mold appear don't panic, just wipe the mold off the meat with a paper towel dipped in vinegar.

Caramelised Carrot & Peanut soup


I've had this recipe on my mind ever since I heard about it, and got my hands on a pressure cooker (which is essential). The pressure cooker along with some baking soda (which increases the pH and in turn speeds up the Maillard reaction) enable the carrots to caramelise.

You can find the original recipe by Nathan Myhrvold at www.foodandwine.com, and in his book Modernist Cuisine: The Art and Science of Cooking (which would make an excellent Christmas pressie). I have altered it slightly, by using vegetable stock instead of carrot juice, olive oil in place of butter and a touch of peanut. So the original recipe is all about the carrot, my tweaks use it as a base flavour.


Peel and chop 500 grams of carrots place in a pressure cooker along with 3 tablespoons of olive oil and 1/4 teaspoon of baking soda. Cook on high pressure for 15 minutes. The strength of the caramel aroma is quite surprising.

Once the time is up release the pressure (if electric use the pressure release valve or traditional run it under cold water to lower the pressure). Pour in 500 ml of vegetable stock (make sure it's not too strong flavoured, as you don't want to muddy the flavour of carrot. Dilute it if you have to), add 1/2 teaspoon of salt (coarse/kosher) and purée with a dash more olive oil and a spoon of good peanut butter (by good I mean an ingredient list that has only peanuts and salt) don't overdo the peanut butter as it will over power the soup.

Once puréed pass it through a fine sieve, and then warm through before serving. Garnish with caraway seeds, flaked dried chilli, olive oil and natural yoghurt.

Saturday, November 12, 2011

Slow, slow prime rib


Nothing beats walking in to your local butcher and being able to ask for something to cook long and slow, and get a bevy of options back from someone who is obviously proud of their product. In this case we walked away with a prime rib.


The plan was a very long slow cook surrounded by shallots on a bed of aromatics, and braised in rich beef stock.


When cooking any piece of meat, from steak to big roasting piece, leave it out on the bench for at least half an hour, you don't want to go from fridge to oven (or pan). While the beef is resting on the bench peel a bunch of shallots.

Give the beef a heavy dose of salt and pepper, and finish with a sear on all sides in a very hot pan.


Place the beef on a bed of thyme, bay and other aromatic herbs, surround with peeled shallots and then add about 1 cup of rich beef stock. Cover and cook at 115-125°C for about 4 hours.


The beef was served up with some hasselback potatoes. They are very easy to prepare, just make slices through the potato, making sure not to go all the way through, rub with oil or water and sprinkle over with salt. While the beef is resting crank the oven up to about 200°C and roast the potatoes for about half an hour.


Just before serving, drain off the liquid to a pan and reduce a little and freshen up with some chopped herbs, and adjust the seasoning and finally add the shallots to warm through.


Carve the the beef in to 'steaks' topped with the caramelised shallot and jus.

Wednesday, November 9, 2011

Homemade Bacon - Part 1


Ever since reading Michael Ruhlman's post on home curing Pancetta I had an overwhelming urge to make my own bacon, and with the purchase of a BBQ and now having the ability to smoke stuff, it had to be done.


So I set about finding some pink salt also known as Prague Powder #1 (it's a mix of salt and sodium nitrite), I had little luck trying to find a store or supplier handy in NZ, and was about to ring the local butcher when I finally thought of TradeMe, lo and behold success!

The pink salt turned up and I had a pork belly ready to turn in to bacon, so I turned to Ruhlman's website to get the recipe for the curing mix. By now I had read up a bit on Sodium Nitrite and the latest Cooking Issues radio show didn't help at easing my mind about using an ingredient that is essentially toxic.

So with that paranoia swirling around my head I thoroughly checked the recipe. The Sodium Nitrite levels were greater than 200ppm (parts per million), damn the FDA recommends having a level of less than 200ppm for human consumption. Was I to trust a very famous chef or the FDA? Thank god for twitter! One tweet later a tweet back "we're altering all pink salt recipes: measure it at 0.25% of weight of meat for 156 pp". A bit of maths later I had my mix recipe.

450 grams of Kosher Salt
225 grams of Sugar
35 grams of Pink Salt


Mix it in a jar and store in a dry place, make sure to mark it as Curing Salt as you don't want to accidentally consume it. I recommend storing it out of the kitchen to avoid this.


Weigh the piece of pork that will be cured and measure out 5% by weight of the Curing mix.


To flavour the pork, I coarsely ground some black pepper, juniper berries and bay leaves. I then mixed in quarter of a cup of Muscovado sugar and the weighed curing mix.


I found a zip lock bag an easy way to evenly distribute the mix.


Spread the mix evenly over the pork and place in a zip lock bag. Place in the fridge for 7 days, making sure to redistribute the mix around the meat each day, and flip over.

Well that's where I'm at, in a few more days it'll come out of the fridge, get rinsed off and hung up to dry, and finally after drying for up to 7 days (I think) it'll get smoked... So more soon.

Read all 3 parts